Sunday, May 31, 2009

Simply Fresh Fruit Rolled Cake: Simple cake that looks great!

I have a lot of work at the end of each month (well, if you work as the accountant you will understand me >*<). So I will have less time for my baking world ^ ^", and I really don't like this situation.
But baking is what I live my life for, so I must make something, easy quick and yes, lovely haha. So, to fulfill my need this cake is the answer.
Simple but with a little decoration, this cake can be a show stopper for your party.

The method for this cake is very easy, and foolproof too. By beating the egg white separately, the precious air pocket that you need for making the sponge cake puff up in the oven ^ ^.

I think that if you afraid to make the sponge cake, this is the one that you must try, and you will be happy with the result, I promise.

I got this recipe from the book name: ロールケーキの本 (The book of rolled cake) by Hisako Ogita.


Simply Fresh Fruit Rolled Cake


Sponge cake


3

Eggs (separated)

70g

Sugar

40g

Cake flour

25g

Butter (melted)


Filling


200 cc.

Whipping cream

20g

Sugar


Fruits of your choices


Preheat the oven to180°C
Line the base of 30X30 cm pan with baking paper.


Using hand mixer, beat the egg white with sugar (add the sugar gradually) until stiff peaks form.

Pour the egg yolks into the egg white, beat with low speed for 1 minutes.
Sift the flour into the bowl and fold to combine.
Pour the melted butter into the bowl, and fold lightly to combine, then pour the batter into the prepared pan.

Bake for 9-10 minutes, or until lightly golden.

While baking the cake, spray the clean table clothes with water.
As soon as the cake came out of the oven turn the cake over the clothes, pull the baking paper off.
Roll the cake with the clothes, then let the cake cool on the wire rack.

Whip the whipping cream with the sugar until soft peaks formed.

Unfold the cake and spread the whipped cream over the cake, fill with the fruits.
Reroll the cake.
Decorated with fruits and whipped cream (as you like ^ ^).

Simply Fresh Fruit Rolled Cake: Simple cake that looks great!

Wednesday, May 27, 2009

May 2009 Daring Bakers Challenge #30: Apple Strudel

I'd never thought that apple strudel would be hard, until yesterday, >*<. I started with a great feeling, ok, it's just a time for another baking. But I always have a problem that when I read the recipe sometime I just misunderstand it.

So, after I made the dough and filled it, and rolled it, I knew that I have a problem. The dough was tearing apart, because I just sprinkled the filling all over the dough, and I had to throw away the first batch.

Then I started again, and this time everything was fine, (the one that I took the picture of the instruction ^_^). I thought that it'd be a good job and I could do it without any problem at all. It's going into the oven and the sweet aroma was filling up my room. But the disaster was after that. When the strudel was done, I took it out of the oven and it was flying into the floor, in front of my eyes. I cried, yes, I really cried, I felt so tried and I thought about skipping this challenge >*<. But I just can't, I already did it even I felt like giving up yesterday, I wake up this morning with my intention to make it again. It's fun to play with the dough, to make it tissue thin, like when playing with play dough haha. And you can see that I can make it (anyway I made half of the recipe for today, it's the one that I took the picture for the finished product) , it's not hard to make, and I really want everyone to try it too, ^_^, but hope you don't throw it on the floor like me.

The May Daring Bakers’ challenge was hosted by Linda of make life sweeter! and Courtney of
Coco Cooks. They chose Apple Strudel from the recipe book Kaffeehaus: Exquisite Desserts from the Classic Cafés of Vienna, Budapest and Prague by Rick Rodgers.


Apple strudel
from: Exquisite Desserts
from the Classic Cafés of Vienna, Budapest and Prague
by Rick Rodgers


Strudel dough


1 1/3 cups (200 g)

unbleached flour

1/8 teaspoon

salt

7 tablespoons (105 ml)

water, plus more if needed

2 tablespoons (30 ml)

vegetable oil, plus additional for coating the dough

1/2 teaspoon

cider vinegar


Apple filling


2 tablespoons (30 ml)

golden rum

3 tablespoons (45 ml)

raisins

1/4 teaspoon

ground cinnamon

1/3 cup plus 1 tablespoon (80 g)

sugar

1/2 cup (1 stick / 115 g)

unsalted butter, melted, divided

1 1/2 cups (350 ml)

fresh bread crumbs

1/2 cup (120 ml, about 60 g)

coarsely chopped walnuts

2 pounds (900 g)

tart cooking apples, peeled, cored and cut into ¼ inch-thick slices (use apples that hold their shape during baking)


Combine the flour and salt in a stand-mixer fitted with the paddle attachment. Mix the water, oil and vinegar in a measuring cup. Add the water/oil mixture to the flour with the mixer on low speed. You will get a soft dough. Make sure it is not too dry, add a little more water if necessary.
Take the dough out of the mixer. Change to the dough hook. Put the dough ball back in the mixer. Let the dough knead on medium until you get a soft dough ball with a somewhat rough surface.

Take the dough out of the mixer and continue kneading by hand on an unfloured work surface. Knead for about 2 minutes. Pick up the dough and throw it down hard onto your working surface occasionally.
Shape the dough into a ball and transfer it to a plate. Oil the top of the dough ball lightly. Cover the ball tightly with plastic wrap. Allow to stand for 30-90 minutes (longer is better).

Make the filling:

1.Heat 3 tablespoons of the butter in a large skillet over medium-high. Add the breadcrumbs and cook whilst stirring until golden and toasted. This will take about 3 minutes. Let it cool completely.


2. Mix the rum and raisins in a bowl. Mix the cinnamon and sugar in another bowl. Mix the apples with the raisins (including the rum), and the cinnamon sugar

Make the strudel dough and fill it:

1. It would be best if you have a work area that you can walk around on all sides like a 36 inch (90 cm) round table or a work surface of 23 x 38 inches (60 x 100 cm). Cover your working area with table cloth, dust it with flour and rub it into the fabric. Put your dough ball in the middle and roll it out as much as you can.
Pick the dough up by holding it by an edge. This way the weight of the dough and gravity can help stretching it as it hangs. Using the back of your hands to gently stretch and pull the dough. You can use your forearms to support it.

2. The dough will become too large to hold. Put it on your work surface. Leave the thicker edge of the dough to hang over the edge of the table. Place your hands underneath the dough and stretch and pull the dough thinner using the backs of your hands. Stretch and pull the dough until it's about 2 feet (60 cm) wide and 3 feet (90 cm) long, it will be tissue-thin by this time. Cut away the thick dough around the edges with scissors. The dough is now ready to be filled.


3. Put the rack in the upper third of the oven and preheat the oven to 400°F (200°C). Line a large baking sheet with baking paper (parchment paper). Spread about 3 tablespoons of the remaining melted butter over the dough using your hands (a bristle brush could tear the dough, you could use a special feather pastry brush instead of your hands). Sprinkle the buttered dough with the bread crumbs. Spread the walnuts about 3 inches (8 cm) from the short edge of the dough in a 6-inch-(15cm)-wide strip. Spread the apple mixture over the walnuts.


4. Fold the short end of the dough onto the filling. Lift the tablecloth at the short end of the dough so that the strudel rolls onto itself. Transfer the strudel to the prepared baking sheet by lifting it. Curve it into a horseshoe to fit. Tuck the ends under the strudel. Brush the top with the remaining melted butter.

5. Bake the strudel for about 30 minutes or until it is deep golden brown. Cool for at least 30 minutes before slicing. Use a serrated knife and serve either warm or at room temperature. It is best on the day it is baked.

Well, this is the one that I made after all my failure, haha!


May 2009 Daring Bakers Challenge #30: Apple Strudel

Saturday, May 23, 2009

Strawberry and Pistachio Financier: Lovely green and red!

I love the color of this financier, green and red, like a little jewel ^ ^. This recipe is the combination of 2 flavors, rich from the nut and tangy from the strawberry, and the strawberry give this financier the great fragrance too.

I made these financiers with an idea of easy afternoon tea, a small treat that is not heavy in both appearance and the taste. I thought about the berry, floral or herbals tea, not the darkest or bitter one. And yes this one is answer my need, it's great with berry or floral tea, the texture of the financier, the crunchiness of the chopped nut when combine with a softness of the baked strawberry, it's delicious.

I think about using other kinds of fruit too, like a small blueberry of raspberry, well, it might need some experiment ^ ^.
Anyway, when it cames to the tea time treats, the possibility is unlimited.

Note: I use silicone pan so I don't need to grease the pan before put the batter in, but if you using other kinds of pan make sure your pan is greased and floured. The pan that I use is petits- fours pan (about 4X2cm) but you can make this financier in mini muffin tins but you will get less pieces (about 20 pieces).

The recipe came from the book name: FIGARO Books cuisine vol.2 魅惑のフレンチ・デザート (フィガロ・ブックス キュイジーヌ vol. 2) , from the FIGARO MAGAZINE (In Japan).


Strawberry and Pistachio Financier
Makes 25 pieces (4 cm x 2 cm)

50g

Almond powder

80g

Pistachio (skin removed)

20g

Pistachio (skin removed and chopped)

75g

Butter

80g

Icing sugar

30g

Cake flour

3

Egg white (about 90g)

20

Small strawberry (cut into 1 cm pieces)


Melt the butter in the pan over low heat, until the milk solids sink to the bottom of the pan and begin to brown. Remove the pan from the heat and let the butter cool completely.(it’s called “Beurre noisette”)
Pour the golden liquid into a bowl discard the brown solid.

Put 80 g pistachio into the food processor bowl, process until fine. Pour flour, almond powder, and icing sugar into the same bowl, and process until powdery.
Sift the mixture into the mixing bowl.

Pour the melted butter into the flour mixture, mix to combine.
Mix in the egg white in 2 additions, until homogeneous.
Cover the bowl with plastic wrap, and refrigerate the batter for 2 hours.

Before baking preheat the oven to 180°C


Scoop the batter into the pan (if using metal pan, brush it with butter).
Put the strawberry on top of the batter, and sprinkle with chopped pistachio (lightly press the nut into the batter).
Bake for 20 minutes, or until golden.

Strawberry and Pistachio Financier: Lovely green and red!

Wednesday, May 20, 2009

Orange Brioche and The review of the Book :パンで幸せ三昧―賢く作ると、なるほどおいしい!

As I promise you before about the book name:パンで幸せ三昧―賢く作ると、なるほどおいしい! (LEE CREATIVE KITCHEN), that I will write about it. So, I have to full fill my mission by testing another recipe ^ ^.
But before I will talk about it, I have to tell you something. You can see that I change my watermark, and this is the story that I want to tell you.
I must say "Thank you" to Ngoc Anh Hoang, a lovely reader in Vietnam, who told me about the web site that uses my photo without my permission, so I redesign my watermark to make it harder to remove.

I don't tell you the name of the site because Ngoc Anh Hoang already sent them the letter and hope they will be ashame, and don't do anything like this again. I don't mind if anyone will use my recipes or photos, but I just ask for them to give me the credit, that's all!
Because when I posting I mean "I really want to share" and I hope everyone will understand. So, let's talk about the book ^ ^.
パンで幸せ三昧―賢く作ると、なるほどおいしい! (LEE CREATIVE KITCHEN) is a collection of bread recipe, and I just can't stay away from this kind of book haha.
It start with the basic bread and how to knead (with a clear picture of instruction, Japanese style) it, from table rolls, milk bread, raisin bread, butter roll, semi-hard roll, croissant bagel and foccacia.

Follow by the bread variation (28 items!), like olive bread, whole wheat, bread with fruits and nut (there are many recipe that I want to try, ex. bacon and onion bread, I already tried sweet corn bread ) . If you know how to make the basic bread you will be able to make different kinds of bread too.

Following with the section of quick bread and muffin. In this section there are a lot of pizza recipes too, yummy, yummy ^_^.

Then the rest 5 sections are about the bread meals, like French toasted (21 varieties, lol, I love the one name: strawberry and coconut French toasted).
Open sandwich section is quite lovely, it can be use for the canape too.

The sandwich section is, well, sandwich haha, rolled sandwiches, toasted sandwiches, bagel, pita, baguette croissants and hamburger. Different kinds of bread and different kind of filling, so if you have sandwich for your lunch, it's really helpful.

Then the pizza toasted section, it's easy and delicious, just one loaf of bread you will be able to create 10 pizza toasted (and after reading it, you might get more idea, ^ ^).

The last section is bread become meal, bread quiche, soup, (well, and the idea of bread tatin, lovely).

So, I do love this book, it's great for the bread and variations. And for everyone who love eating carbohydrate, you might love it too.

So, let's talk about today menu, ^ ^.
It's the first menu that catches my attention, well, I just really want to try. I love brioche, and I love orange jam, so, I think that it will be great if they are together.
The percentage of the butter in this recipe is not very high, so it's not hard too knead, and the butter is not melt a lot when shaping the brioche.
But if you don't want to shape like mine, you can roll the dough into a ball and bake it that way, it's delicious in any shape, ^_^.

Recipe from: パンで幸せ三昧―賢く作ると、なるほどおいしい! (LEE CREATIVE KITCHEN)


Orange Jam Brioche
Makes 14 pieces (5 cm)


250g

Bread flour

2tbsp

Caster sugar

5g

Instant yeast

½ tsp

Salt

90ml

Orange juice (do not use fresh)

1

Egg

75g

Unsalted butter

40g

Orange marmalade


Egg wash (1egg + 1tbsp water)


Put the flour, the sugar and yeast in a bowl, whisk to combine, add and salt whisk again. Pour the liquids mixture into the bowl.

Use large spoon (or pastry scraper) to mix everything together, and knead briefly to bring all the ingredients together.

Add the butter and knead to combine.
Take the dough out of the bowl and knead by using the heel of your hands to compress and push the dough away from you, then fold it back over itself (see the picture here). Give the dough a little turn and repeat. Put the weight of your body into the motion and get into a rhythm. Keep folding over and compressing the dough.

Knead for 5 - 10 minutes or until the dough is soft, pliable, this dough won't be satiny, but it will stop being sticky.

Pour the jam over the dough and knead until all the jam is fully distributed.

Put the dough into a light buttered bowl. Let the dough rise in a warm place until double in size about 1 hour.


Take the dough out of the bowl, deflate by touch it lightly.
Cut the dough into 14 pieces, roll into a ball and let them rest for 10 minutes.

Shape the dough:

Roll the dough into a bowling pin shape (one side small one side big).
Punch a hole in bigger side.
Flip the small side under the bigger one and pass the small dough through the hole.

Place the dough into the pan, lined with paper cases.
Preheat the oven to 180°C.
When the dough almost double in size, brush with egg wash.
Bake for 15 minutes, or until the brioche is golden brown.

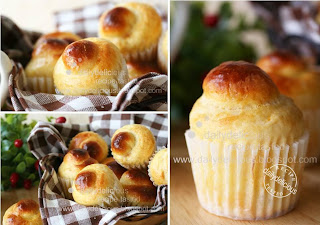
Orange Jam Brioche: lovely morning bread

Brioche on Foodista

Sunday, May 17, 2009

Mini Blueberry Muffins with Blueberry Yogurt Smoothies: Very Berry Day!

I have a bad habit, every time that I go to Supermarket, I just can't buy only the things in my list. I end up with many many items which I still don't know what to do about them, haha.

The last time I bought a lot of blueberry (and other kinds of fruits >*<) without knowing what they will turn out to be. So I have to find the good way to use it. I remember that last week, when I had a little party with my friends, someone talked about the blueberry muffin. It's not hard to make and it's delicious, ^_^. Then I decided to make the muffin. I always love mini size so I use my favorite mini cheese cake pan to create the mini blueberry muffin but if you use the standard muffin pan you will get 5-6 pieces than 10 pieces. But morning won't be complete without a cup of refreshing smoothies, so to make the great start, I suggest the blueberry yogurt smoothie! Well, a glass of smoothie and a piece of muffin, it's the good day. The smoothie recipe is coming from: たかこ@caramel milk tea カフェのデザートとランチのレシピ by Takako Inada


Mini Blueberry Muffins

Makes 10


160g

All-purpose flour

80g

Sugar

1¼ tsp

Baking powder

tsp

Baking soda

¼ tsp

Salt

½ tsp

Cinnamon

125 ml

Milk

65g

Unsalted butter (melted)

1

Egg

100g

Blueberry (fresh or frozen)


Preheat the oven to 200°C. Line the mini cheese cake pan with paper cups.

Pour the milk and egg into the melted butter, whisk to combine.

Whisk the dry ingredients together.
Pour the butter mixture into the dry ingredients, mix together with rubber spatula.
Stir just until blended.
Add 65g of the blueberry.


Stir just until evenly incorporated, then scoop the batter into the prepared pans.
Sprinkle the reserved blueberry on top.
Bake until a toothpick inserted into the center of a muffin comes out clean, about 15-20 minutes.
Let the muffin rest in the pan for 3-5 minutes then remove.


Blueberry Yogurt Smoothies

Serves 2


60 ml

Milk

80 g

Plain yogurt

120g

Frozen blueberry

1-2 tbsp

Honey


Fresh blueberry for sprinkle on top


Mint for decoration


Put all the ingredients in the blender and process until smooth.
Pour the smoothie into the glass sprinkle the fresh blueberry on top and decorate with mint leaf.

From: たかこ@caramel milk tea カフェのデザートとランチのレシピ by Takako Inada

Mini Blueberry Muffins with Blueberry Yogurt Smoothies: Very Berry Day!

Thursday, May 14, 2009

Chicken Farm Baker' Project # 10: Plated dessert - art & sense: Aromatic Panna cotta with Fresh Fruit Sauce

Chicken Farm Baker' Project # 10 is "Plated dessert - art & sense". Well, it's not common for me to do anything like this, most of my work are easy home bake, haha.

But it's a good time to try something new (and it's the main reason for our group, we need creativity and try something new), and if we never make it before it's GREAT.

So, this time I make "Aromatic Pannacotta with Fresh Fruit Sauce", even I made the panna cotta before but this recipe is different. The additional ingredients make the dessert fill with great fragrance when combine with the fresh fruit sauce, the flavor is both sensation and refresh.

And the main theme for this project is plate decoration, so I decided to create the art work form the sauce, but it will be more delicious when you serve it with more sauce (the raspberry sauce is delicious, I love it, ^ ^).

This recipe is an adaptation from the book name: イタリア菓子の基本
(Basic Italian Desserts) by Kataoka Mamoru


Aromatic Panna cotta with Fresh Fruit Sauce

Makes 8 ( 5cm pudding molds)


Panna cotta


5g

Gelatin

625ml

Whipping cream

45g

Caster sugar

Peel

From half of the lemon

Peel

From half of the orange

20

Coffee bean

½

Cinnamon stick


Kiwi sauce


100g

Kiwi (peeled and cut into pieces)

20g

Caster sugar

1tsp

Lemon juice


Raspberry sauce


100g

Frozen or fresh raspberry

20g

Caster sugar

1tsp

Lemon juice


For decoration


Fresh fruit and mint leaf


Make the Panna cotta:

Put all the ingredients in a medium pan, let them rest for 30 minutes.
Bring the mixture to boil, then take the pan out of the heat.

Bloom the gelatin for 3-5 minutes then put the gelatin into the hot mixture, whisk to combine.
Pass the mixture through a sieve.
Let the mixture cool completely before pour into the mold.
Refrigerate for 4 hours to overnight.

Make the Kiwi sauce:

Put the kiwi and lemon juice into the food processor bowl, process until fine.
Pass the mixture through a sieve, then mix with sugar.

Make the Raspberry sauce:

Put the raspberry and lemon juice into the food processor bowl, process until fine.
Pass the mixture through a sieve, then mix with sugar.

To serve:


Place the panna cotta in the plate, decorate with fresh fruits, and sauce.

Chicken Farm Baker' Project # 10: Plated dessert - art & sense:
Aromatic Panna cotta with Fresh Fruit Sauce

Wednesday, May 13, 2009

Langues de chat (cat's tongues cookies): easy cookies to get rid of egg whites

Whenever I make a lot of ice cream, I will get into problem, >*<. Not a big one but it's annoying for me, the problem is I have too many egg whites -*-. I try to make macaron or butter cream but it's still there, so I have to find other way to use it.

Then I remember, there are some of the cookies that use egg whites for their crisp character, like tulie or langues de chat. I make the tulies many time so this time let make something new (haha, for my blog).

Langues de chat is easier to make than the tulies, just pipe the mixture and it will spread into thin cookies in the oven.

So, let's change the problem into something delicious. It'll be a good way to get rid of the egg whites in your fridge too.


Langues de chat (cat's tongues cookies)
Makes about 60-70 pieces


70g

Unsalted butter

150g

Icing sugar (sifted)

120ml

Whipping cream


Vanilla essence

60g

Egg whites

130g

Cake flour (sifted)

¼ tsp

Sea salt


Preheat the oven to 170°C. Line the baking sheet with baking paper.

Melt the butter by putting the butter in a bowl and place over the pan of simmering water, then take the bowl out of the pan.
Pour the icing sugar and salt in the butter whisk to combine.
Pour the cream into the butter bowl and mix, then whisk in the vanilla essence.

Pour the egg whites into the butter mixture, whisk to combine.
Put the flour into the butter mixture, fold to combine.

Put the mixture into the piping bag fitted with 1.5cm nozzle.
Pipe into 6cm long cookie.

Bake the cookies for 10-15 minutes, or until golden brown around the edge.

Langues de chat (cat's tongue cookies): easy cookies to get rid of egg whites

Wednesday, May 6, 2009

Coffee Marbled Cake with Pecan Nut

From the problem that I always have the mascarpone cheese in the fridge but I can't use it all, haha. But what can I do? The new book from Takako Inada : たかこさんの粉ものお菓子 ~ブランチ&ティータイムのお楽しみ~ ( Lunch and tea time sweet from Takako) can give me the answer.

The book is cute and there are a lot of the variations. (If you read my blog you will remember that I really love this woman, Takako Inada, I have almost all of her books). Most of the recipe doesn't use butter (last year it's very hard to find the butter in Japan, my friends complained about it every time that I talked to them). So the base are cheese, sour cream, oil or yogurt, it might great for the time that we can't find the butter !

This cake is very easy (again ^_^), the mixture of the cheese and the coffee is a good combination.
The original recipe use a lot of coffee, but I think it a bit bitter, so I reduce it. But if you like the bitter taste you double the amount of the coffee (both in the cake and the icing). So, anyone who enjoy coffee flavor will love this cake too.


Coffee Marbled Cake with Pecan Nut

Makes 15x15 cm


Cake


50g

Cake flour

20g

Almond powder

20g

Pecan nut (lightly roasted and chopped)

¼ tsp

Baking powder

1

Egg

45g

Light brown sugar

30g

Vegetable oil

50g

Mascarpone cheese


A dash of salt

1tsp

Instant coffee

1tsp

Coffee liqueur

12

Whole pecan for topping


Coffee icing


½ tsp

Instant coffee

1tsp

Milk

20g

Icing sugar


Preheat the oven to 170°C. Line the 15x15 cm square pan with baking paper.

Mix the instant coffee with the liqueur.
Melt the mascarpone cheese in the microwave (about 20-30 seconds), let cool completely .
Sift the flour, almond powder, salt and baking powder together.

Beat the egg with the sugar.

When the egg is light and puffy, pour the mascarpone cheese into the mixture.

Put the flour mixture and pecan nut into the egg mixture, fold to combine.
Pour the oil into the mixture, fold to combine.

Take half of the batter and mix into the coffee mixture.
Pour the coffee mixture into the batter bowl and fold only 1-2 time to create the marbled affect.
Pour the mixture into the pan and place the pecan nut on top of the cake.

Bake for 25-30 minutes.


Mix all the ingredients together, put in the bag.
Use the icing to drizzle over the cake.

Coffee Marbled Cake with Pecan Nut

Sunday, May 3, 2009

Puffy Twist Donut: Easy treats for everyone!

It started from the moment that my sister turn on the TV, the picture of the golden fried donut was on the screen, and then she turned to me and told me that "I really want to eat donut.".

And it's Sunday morning, how can I let her down when there are a lot of time, ^_^. I took the flour and other ingredients, then after a little bit of kneading, resting, twisting and frying, I can give her what she ask for.
After that, my donut was gone in front of my eye!
I know that many people love donut, it's a bit of childhood memory plus the love for fried food, haha. because I have to admit that I really love fried food, and I just can't resist it!

This donut is easy to make (oh, you know me I don't like anything difficult, >*<, I think it's happy when you don't have a stress so why make difficult thing). Kneading is easy too, and you can make this treats without an oven. It might be the good start for anyone ho want to make their own bread but don't have the oven yet, ^_^. So, don't be afraid, just grasp all the ingredients and when into the kitchen, you will get your delicious treats for less than 2 hours.


Puffy Twist Donut

Makes 8


200g

Bread flour

20g

Sugar

½ tsp

Salt

1tsp

Instant yeast

150cc.

Milk

30g

Unsalted butter


Oil for frying


Superfine sugar


Put the flour, the sugar and yeast in a bowl, whisk to combine, add and salt whisk again. Pour the milk into the bowl.

Use large spoon (or pastry scraper) to mix everything together, and knead briefly to bring all the ingredients together.

Take the dough out of the bowl and knead, you will see the dough will be elastic after about 2 minutes.

Add the butter and knead (see the picture in Hand knead bread making - How to) by using the heel of your hands to compress and push the dough away from you, then fold it back over itself. Give the dough a little turn and repeat. Put the weight of your body into the motion and get into a rhythm. Keep folding over and compressing the dough. Knead for 6-8 minutes or until the dough is soft, pliable, smooth and slightly shiny, almost satiny.

Put the dough into a light buttered bowl. Let the dough rise in a warm place until double in size (can be 1 hour or 1 hour and a half check often depend on the temperature).

Cut the dough into 8 pieces and roll into a ball, let the balls rest for10 minutes.
Roll each ball into a rope about 20 cm. long.
Twist each side of the rope into opposite direction (roll one side up, and the other side down).

Hold each end up, the dough will twist together.
Place the finished twists on the baking sheet, let them rest for 30 minutes.

Preheat the oil in a deep fryer to 170°C. Gently place the donuts into the oil. Cook until golden on both sides, then remove to drain on paper towels. Place the donut in the bowl of superfine sugar, turn to coat the donut with the sugar, transfer to a cooling rack placed in baking pan.

Puffy Twist Donut: Easy treats for everyone!