Saturday, September 27, 2008

September 2008 Daring Bakers Challenge #22: Lavash Crackers & Toppings and Avocado Dip

This month’s challenge is one of the great challenges for me. As I told you that I have a lot of cookbook and I can’t try them all, The Daring Bakers challenge is a great chance to try something new. I have this book (The Bread Baker's Apprentice: Mastering the Art of Extraordinary Bread by Peter Reinhart) for a long time, and tried some of the recipes but I don’t even remember this one, haha, so this is the treasure found for me. But I have a little problem when making this cracker, after rolling it into paper thin, I found out that my oven temperature was not 350 degrees Fahrenheit yet. I had to wait for 15 minutes (I don’t know why, I already preheat it). So, my cracker was puff up a little bit and not crunchy as I wished, and now it turns chewy even I keep it in the box.

I made an avocado and olive dip, to serve with the cracker. I found the basic recipe in the Japanese cookbook but I add a lot of this and that to my taste. The how-to is so easy just throw everything in the food processor and process until blend, that is my dip.


Lavash Crackers & Toppings

Makes 1 sheet pan of crackers


1 ½ cups (6.75 oz)

unbleached bread flour

½ tsp (.13 oz)

salt

½ tsp (.055 oz)

instant yeast

1 Tb (.75 oz)

agave syrup or sugar (I use honey)

1 Tb (.5 oz)

vegetable oil

to ½ cup + 2 Tb (3 to 4 oz)

water, at room temperature


Poppy seeds, sesame seeds, paprika, cumin seeds, caraway seeds, or kosher salt for toppings


1. In a mixing bowl, stir together the flour, salt yeast, honey, oil, and just enough water to bring everything together into a ball. You may not need the full ½ cup + 2 Tb of water, but be prepared to use it all if needed.

2. Sprinkle some flour on the counter and transfer the dough to the counter. Knead for about 10 minutes, or until the ingredients are evenly distributed. The dough should pass the windowpane test (see http://www.wikihow.com/Determine-if-Bre … ong-Enough for a discription of this) and register 77 degrees to 81 degrees Fahrenheit. The dough should be firmer than French bread dough, but not quite as firm as bagel dough (what I call medium-firm dough), satiny to the touch, not tacky, and supple enough to stretch when pulled. Lightly oil a bowl and transfer the dough to the bowl, rolling it around to coat it with oil. Cover the bowl with plastic wrap.

3. Ferment at room temperature for 90 minutes, or until the dough doubles in size. (You can also retard the dough overnight in the refrigerator immediately after kneading or mixing).


4. Mist the counter lightly with spray oil and transfer the dough to the counter. Press the dough into a square with your hand and dust the top of the dough lightly with flour. Roll it out with a rolling pin into a paper thin sheet about 15 inches by 12 inches. You may have to stop from time to time so that the gluten can relax. At these times, lift the dough from the counter and wave it a little, and then lay it back down. Cover it with a towel or plastic wrap while it relaxes. When it is the desired thinness, let the dough relax for 5 minutes. Line a sheet pan with baking parchment. Carefully lift the sheet of dough and lay it on the parchment. If it overlaps the edge of the pan, snip off the excess with scissors.


5. Preheat the oven to 350 degrees Fahrenheit with the oven rack on the middle shelf. Mist the top of the dough with water and sprinkle a covering of seeds or spices on the dough (such as alternating rows of poppy seeds, sesame seeds, paprika, cumin seeds, caraway seeds, kosher or pretzel salt, etc.) Be careful with spices and salt - a little goes a long way. If you want to precut the cracker, use a pizza cutter (rolling blade) and cut diamonds or rectangles in the dough. You do not need to separate the pieces, as they will snap apart after baking. If you want to make shards, bake the sheet of dough without cutting it first.

6. Bake for 15 to 20 minutes, or until the crackers begin to brown evenly across the top (the time will depend on how thinly and evenly you rolled the dough).

7. When the crackers are baked, remove the pan from the oven and let them cool in the pan for about 10 minutes. You can then snap them apart or snap off shards and serve.


Avocado Dip

Makes about ½ cup


1

Avocado (peeled and diced)

8

Black olive (pitted)

1

Shallot (finely chopped)

3 tbsp

Mayonnaise


Juice from 1 lemon


Salt and pepper


Put every ingredient in the food processor, process until blend.

Adjust the taste with more lemon juice or salt and pepper.


September 2008 Daring Bakers Challenge #22: Lavash Crackers & Toppings and Avocado Dip

Thursday, September 25, 2008

ALL-AMERICAN, ALL-DELICIOUS APPLE PIE


My nephew loves apple pie, every times that he comes to my house this is the pie which I have to make. But I don’t like to stick to only one recipe, so every times, I try new recipe. This time the recipe comes from: ...................... and I’m not disappointed. The pie dough is very easy to make (I forgot to take the picture, =*=). The trick of sprinkle the bottom of the pie with the graham cracker crumbs is great; I find the bottom is less soggy than usual. The taste is great, but I had to use square pan instead of the round one because I just couldn’t find my glass pie pan in my cup board (and I still wander where it is, I reorganized my cup board after that and still couldn’t find it, oh mine). Luckily the pie came out well, and I post this recipe for my sister, so she can make it at home as she told me that the apple tree in her back yard gives her a load of apple. Hope she will find it’s easy too.
*Note: start by making the pie dough first, then make the filling.
ALL-AMERICAN, ALL-DELICIOUS APPLE PIE
Makes 9 inches pie


GOOD FOR ALMOST EVERYTHING PIE DOUGH
FOR A 9-INCH DOUBLE CRUST


3 cups
all-purpose flour
¼ cup
sugar
1½ tsp
Salt
10 oz
very cold (frozen is fine) unsalted butter, cut into tablespoon-size pieces
⅓ cup
very cold (frozen is even better) vegetable shortening, cut into 4 pieces

About ½ cup ice water


Put the flour, sugar and salt in a food processor fitted with a metal blade; pulse just to combine the ingredients. Drop in the butter and shortening and pulse only until the butter and shortening are cut into the flour. Until you have some pieces the size of fat green peas and others the size of barley. Pulsing the machine on and off, gradually add about 6 table spoons of the water add a little water and pulse once, add some more water, pulse again and keep going that way. Then use a few long pulses to get the water into the flour. If, after a dozen or so pulses, the dough doesn’t look evenly moistened or form soft curds, pulse in as much of the remaining water as necessary, or even a few drops more, to get the dough that will stick together when pinched. Big pieces of butter are fine. Scrape the dough out of the work bowl and onto a work surface.
Divide the dough in half. Gather each half into a ball, flatten each ball into a disk and wrap each half in plastic. Refrigerate the dough for at least 1 hour before rolling.
ALL-AMERICAN, ALL-DELICIOUS APPLE PIE

Good for Almost Everything Pie
4 pounds (about 6 verylarge)
apples
¾ cup
sugar

Grated zest of 1 lemon
2 tbsp
quick-cooking tapioca (or potato flour)
¼ tsp
Salt
½ tsp
ground cinnamon
⅛-¼ teaspoon
freshly grated nutmeg
2 tablespoons
graham cracker crumbs (or dry bread crumbs)
2 tablespoons
cold unsalted butter, cut into bits
FOR THE GLAZE (optional)


Milk or heavy cream

Decorating (coarse) or granulated sugar


GETTING READY: Butter a 9-inch deep-dish pie plate (I use a square pan).


On a well-floured surface (or between wax paper, or plastic wrap), roll out one piece of the dough to a thickness of about ⅛ inch. Fit the dough into the buttered pie plate and trim the edges to a ½ -inch overhang. Roll the other piece of dough into a ⅛-inch-thick and slip it onto a baking sheet lined with parchment or a silicone mat. Cover both the circle and the crust in the pie plate with plastic wrap and refrigerate for about 20 minutes, while you preheat the oven and prepare the filling. (The crusts can be well covered and kept refrigerated overnight.)


GETTING READY TO BAKE: Center a rack in the oven and preheat the oven to 425 degrees F. Peel, core and slice the apples into slices about ¼ inch thick. Put the apples into a large bowl and add the sugar, lemon zest, tapioca (or potato flour), cinnamon, nutmeg and salt. Toss everything together really well. Let the mix sit for about 5 minutes, until juice starts to accumulate in the bottom of the bowl.
Remove the pie plate and top crust from the refrigerator and put the pie plate on a baking sheet lined with parchment or a silicone mat. Sprinkle the crumbs evenly over the bottom of the crust and then turn the apples and their juices into the crust. The apples will heap over the top of the crust. Pat them into an even mound. Dot the apples with the bits of cold butter.
Very lightly moisten the rim of the bottom crust with water, then center the top crust over the apples. Either folds the overhang from the top crust under the bottom crust and crimps the crust attractively, or presses the top crust against the bottom crust and trim the overhang from both crusts even with the rim of the pie plate. If you’ve pressed and trimmed the crust, use the tines of a fork to press the two crusts together securely.
Use a sharp paring knife to cut about 6 slits in the top crust. Use the wide end of a piping tip to cut a circle out of the center of the crust as a steam vent. If you’d like, brush the top crust with a little milk or cream and sprinkle it with sugar.
Bake the pie for 15 minutes. Lower the oven temperature to 375 degrees F, and bake the pie for another 50 to 60 minutes (total baking time is between 65 and 75 minutes), or until the crust is gorgeously browned and the juices bubble up through the top crust. After about 40 minutes in the oven, if the top crust looks as if it’s browning too quickly, cover the pie loosely with a foil tent.
Transfer the pie to a rack and let it rest until it is only just warm or until it reaches room temperature.


ALL-AMERICAN, ALL-DELICIOUS APPLE PIE

Tuesday, September 23, 2008

Lemon Macarons with Lemon Buttercream Filling

I had a dream about this recipe two days ago, and I really happy it’s a reality, now. In my dream I could smell the fragrance of the lemon and taste the tangy taste of it, most of all it’s delicious. May be because of the lemon, which my sister carried into the house from the supermarket, their bright color is so lovely.


After the Vanilla Bean Italian Meringue Macarons , I still want to make the macarons using Italian meringue method, so, I decide to use it here.

One of my friends asked me about the shape of the macarons, the vanilla bean macarons are quite flat, so I adjust the recipe to make the batter a little bit stiffer. And you can see that my macarons are thicker and the foot is larger.

I made it 2 times, I take the picture of how-to on the first, but I don’t happy with the color (I use gel color). The second time is the finish product that I show you, the color is so bright and look like lemon, the way I want it to be. The result is from the powder color, and if you want the color to be so tense I suggest using it.

This macarons are the reality of my dream, the lovely lemon color, the fragrance (which I increase from ¼ tsp on my first trial into ½tsp) and the taste of the tangy lemon buttercream.

I have to admit that I felt in love with the macarons making now, and I really hope that you will joy me, because they are so lovely both their look and their taste.

Lemon Macarons with Lemon Buttercream Filling

Makes about 25


Lemon Italian Meringue Macaron

For the macaron base

75 g

almond powder

75 g

icing sugar

25 g

egg whites

½ tsp

Lemon zest

Yellow food coloring (you can skip this but it will give the macaron a lovely color)

*If using powder color, mix it with a little bit of water before use.

For Italian Meringue

120 g

caster sugar

30 g

water

60 g

egg whites

* You will use 90 g for the macaron and the rest will use for the buttercream

Preheat the oven to 150°C.

Mix the macaron base:


Sift together almond powder and icing sugar into a bowl, put the color, lemon zest and egg white into the bowl. Use a pastry scrap to bring everything together. Set aside.

Make the Italian meringue:


In a sauce pan, put the sugar and water and bring to boil over medium low heat.
When the syrup reaches 114°C, start whisking the egg whites.

The syrup is ready when it reaches 120°C; pour it over the egg whites and continue whisking until cold.


Make the macaron:


Mix together the base and 90g of Italian meringue.

The mixture should be softer and very glossy, a little stiffer then cake batter..

Spoon mixture into a piping bag fitted with a 5mm nozzle. Pipe or spoon mixture into 2.5cm rounds onto baking paper-lined (or Silpat) oven trays. When you’ve pipe out all the macarons lift each baking sheet with both hands and then bang it down on the counter (you need to get the air out of the batter).


Bake for 9 minutes to 15 minutes depend on your oven (oven door maintained open with a wooden spoon). Remove from oven and cool on trays. Slide a knife under each macaron to release.


Make the Lemon Butter cream

Make the lemon buttercream

Italian meringue the rest from making the macaron

100 g

Unsalted butter

1½ tbsp

Lemon juice

a dash of salt


Add the butter 1 tablespoon at a time into the meringue. Increase the mixer speed to high for 1 to 2 minutes, or until the butter is fully incorporated. Then add the lemon juice and salt, and mix to combine.


Sandwich macarons with filling.

Refrigerate for at least 1 hour for filling to be firm.


Lemon Macaron with Lemon Buttercream Filling

Sunday, September 21, 2008

Brown Sugar Chocolate Cup Cake: Simply Delight !


I had a little problem last week, not a big one but quite annoying. My oven light just broken and my favorite pan too, how they happened at the same day? Anyway, I called the oven company, just to receive the bad news that they don’t have the light bulb (for my oven model) in stock. So, now I have to use the flashlight when I bake (I like to sit in front of the oven to see how my baked goods go, so I can take them out at the right time). After a couple of time, I think it’ll be easier to use the small oven instead, haha. But the small one has its own limit; the baked goods have to be a little one too. So, cup cake will be my best friend now.
I got this recipe from.............. Actually I wanted to try it for a long time, because I think honey and brown sugar will make the taste of this chocolate cake mellow. And I’m not disappointed, the brown sugar makes the cake moist with a subtle sweet and the cake has a great fragrance of honey. I adjust the amount of the ingredients a little bit, and hope you like the result too.
Brown Sugar Chocolate Cup Cake
Makes 6 cups (3½ oz/cup)


90 g
cake flour
14 g
Cocoa powder
⅓ tsp
baking powder

Pinch of salt
100 g
unsalted butter, at room temperature
85 g
Brown sugar
2
large eggs,
85 g
Nut (I use pecan), lightly toasted
2 tbsp
heavy cream
2 tbsp
honey


1. Preheat the oven to 160°C. Prepare the paper cups. Sift the measured flour, baking powder, cocoa powder and salt together into a bowl and set aside.
2 Whisk the cream and honey together and set aside.
3 Cream the butter and brown sugar together until light and fluffy.
4 Add the egg one at a time, mixing well after each addition.
5 Add half of the dry ingredients, then the cream and honey mixture, mixing well then add the last of the dry ingredients and nut, and mix well.
6 Spoon batter into paper cup, bake for 25-30 minutes, or until the toothpick insert in the center comes out with a little crumb.
Adaptation from: たかこさんの12カ月のかんたん焼き菓子ずっと、たいせつに楽しめる。(Happy and Easy Baking for 12 months from Takako) by 稲田 多佳子(Takako Inada).


Brown Sugar Chocolate Cup Cake

Tuesday, September 16, 2008

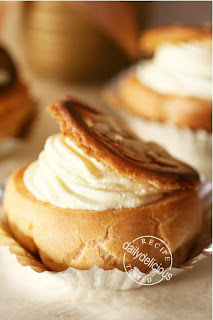
Japanese Choux Cream Variation: Caramel Top Choux Cream


I've got a lot of e-mail asking for the Japanese choux cream recipe. I, myself, have tried to find the good recipe too. If you have a chance to eat the Japanese choux cream, I think you would love it. The softness of the fragrance and sweet filling is contrast to the crunchiness of the pastry, it's so good. My love for Choux cream has began many years ago, in that day I couldn't make it by myself. My choux pastry always becomes soft after getting out of the oven.

The problem comes from the moisture in the dough doesn't evaporate from inside and makes the the pastry soggy (result is the soft choux pastry). So, here comes my solution: keep the door ajar for at last 5 minutes of the baking time this would let the moisture out of the oven (and lower the temperature as this recipe need to use the high heat to puff the pastry up but I find it's too much for my choux). So the pastry will be drier and crunchier, the way I want.

The main recipe come from the book name ............... The book that devoted to the choux cream recipes. There are more interesting recipe from this book, which I will try it and show you if I have a chance.

Here comes the Japanese Choux Cream recipe that everyone ask for, but this is not a simple one. The caramel flavor and the crunchiness from the nut, I hope you will love it as I do.

Note: The recipe starts from making the caramel powder, the choux pastry but you can prepare the filling ahead if you want to.


Caramel Top Choux Cream
Makes 9-10


Caramel powder
7 g
Honey
7 g
unsalted butter
15 g
sugar


Line the baking sheet with non-stick baking paper.
Put all the ingredients in a small sauce pan, and place over low heat.
When the mixture turn into caramel color, pour onto the baking sheet.
Let the mixture dry, and put it in the small food processor and process until fine.
Choux Pastry
Makes 9-10
100 g
water
40 g
unsalted butter
4 g
sugar
60 g
cake flour
2 (100 g)
large eggs, at room temperature


1) Preheat your oven to 220 degrees C. Line baking sheet with waxed or parchment paper.


2) In a heavy bottomed medium saucepan, bring the water, butter, and sugar to the
boil.
3) Once the mixture is at a rolling boil, add all of the flour at once, reduce the heat to medium
and start to stir the mixture vigorously with a wooden spoon. The dough comes together very
quickly, stirring for a further 20 seconds to dry the dough.


4) Transfer the dough into a bowl, add the eggs one at a time, beating after each egg has been added to incorporate it into the dough. In the end the dough should be thick and shiny and when lifted it
should fall back into the bowl in a ribbon.

5) Fill a large pastry bag fitted with a 1 cm plain tip nozzle with the warm cream puff dough.
Pipe the dough, into 3 cm rounds onto the baking sheets.
Leave about 2 inches (5 cm) space in between each dough strip to allow them room to puff.


6) Bake for 25 minutes, or until they are puffed, golden and firm.
*I have my oven door maintained open with a wooden spoon for the last 5 minutes).

Crème Pâtissière
260 g
whole milk
60 g (about3)
egg yolks
32 g
Sugar 1
32 g
Sugar 2
18 g
cornstarch, sifted
10 g
Cake flour, sifted

Vanilla bean
10 g
unsalted butter, at room temperature


1) In a small saucepan, bring the milk and sugar 1 to a boil. In the meantime, combine the yolks, sugar 2, seeds from vanilla bean, cake flour and cornstarch together and whisk in a heavybottomed saucepan.

2) Once the milk has reached a boil, temper the yolks by whisking a couple spoonfuls of the hot milk into the yolk mixture. Continue whisking and slowly pour the rest of the milk into the tempered yolk mixture.

3) Strain the mixture back into the saucepan to remove any egg that may have scrambled. Place the pan over medium heat and whisk vigorously (without stop) until the mixture returns to a boil. Keep whisking vigorously for 1 to 2 more minutes (still over medium heat).

4) Scrape the pastry cream into a small bowl and set it in an ice water bath to stop the cooking process. Make sure to continue stirring the mixture at this point so that it remains smooth. Once the cream has reached a temperature of 140 F,stir in the butter in three or four installments. Return the cream to the icewater bath to continue cooling, stirring occasionally, until it has completely cooled.
Make the caramel top

Caramel powder

Almond sliced


Preheat the oven to 250 °C
Cut the bottom of the pastry and place it in the baking sheet.
Sprinkle with almond slice and the caramel powder.
Bake for 3 minutes, or until the caramel is melted.

Make the Filling
100 g
Whipping cream
7 g
Sugar

Crème Pâtissière


Pour the cream into a bowl and add the sugar. Using a balloon whisk or electric beaters, whip
Fold the whipped cream into the Crème Pâtissière.
Make the Crème Chantilly
360 g
Whipping cream
24 g
Sugar


Pour the cream into a bowl and add the icing sugar. Using a balloon whisk or electric beaters, whip the cream until it just forms soft peaks.
Assemble


Place the choux pastry up side down.
Spoon the filling into a piping bag fitted with a 1cm nozzle, and fill the hole with the filling.
Spoon the Crème Chantilly into a piping bag fitted with a 1 cm star nozzle and pipe over the top of the filling, place the caramel top on top of the cream.


Japanese Choux Cream Variation: Caramel Top Choux Cream

Saturday, September 13, 2008

September 2008, Chicken Farm Bakers’ Project #2: White Chocolate Ice Cream with White Chocolate and Nougat Chunks


We bake by the heart, that's the motto of our group, the Chicken farm Bakers (the name comes from the fact that we use a lot of eggs when baking and it will be great if we have our own farm, haha). Now, we have more member from 2 to 8, I'm so happy. But I don't want to limit ourself to the bake goods, there are so many kinds of sweet which we love.
So this project #2 I'm a host and I suggest White Chocolate Ice Cream.

As we don't limit the creation or the recipe so my Ice Cream is my own creation. Due to the fact that I really want to make white chocolate ice cream but I brought a wrong chocolate (I wanted the plain one but picked the nougat one instead, Haha), so I have to find a delicious way to add the White Chocolate with Nougat into it.

So, welcome you to the Chicken Farm Bakers’ Project #2, the White Chocolate Ice Cream, that become one of my favorite recipes now.


September 2008, Chicken Farm Bakers’ Project #2: White Chocolate Ice Cream with White Chocolate and Nougat Chunks


80 g

White chocolate, Chopped

3

Egg Yolks

25 g

Sugar

¼ teaspoon

Sea salt

1 cup/250 ml

Milk

1 cup/ 250 ml

heavy (whipping) cream

50 g

White chocolate with Nougat, chopped


In a bowl, whisk together the egg yolks, sugar, and the salt. Cook the milk, cream, in a heavy saucepan over medium heat, stirring occasionally, until almost simmering. Slowly pour the milk and cream into the egg-and-sugar mixture, whisking as you pour.

Whisk in the white chocolate until it is completely melted.

Return the mixture to the saucepan. Cook over medium-low heat, stirring constantly with a heat-resistant plastic or wooden spatula, until the custard reaches 175°F and lightly coats the spatula.

Strain the custard into a clean bowl and cool over an ice bath until room temperature. Refrigerate the custard for at least 4 hours or up to overnight.


Churn the ice cream in an ice cream machine according to the manufacturer’s instructions. Fold the White chocolate with Nougat chunks into the ice cream and freeze until scoop able.

White Chocolate Ice Cream with White Chocolate and Nougat Chunks

Friday, September 12, 2008

Cheese and Salami Twists


by 門間 みか ( Mika Monma)

I really like the book from Mikasan and I just bought her second book (I wrote about her first book here). I can see that she add many interesting recipes, how to shape the bread in many style, and the photographs are much more beautiful.

Her recipes seen to be more complicate but it's not the truth, because most of them still base on the same two basic recipe the rich and lean types bread (looks like they are her tread mark, anyway I love it). But don't think that will be boring to see or use the same recipe again because there are more recipes like Bagel (plus variations), plain sandwich bread (4 of it!), butter roll, French bread (with variation too), Chinese steam buns and croissant.

All of the recipes come with clear photo illustration (as always in Japaneses cookbooks), I love the section of her magnet that make from the dough too, it's so cute and it comes with a clear drawing illustration, I will make them some day.

Actually I feel like her book is growing up from the book that don't require any special skill into a book for the people who really want to make something special at home, which is not just a bread. But the bread that looks and taste great, too. It's a great book for anyone who love baking bread at home, because you won't get only the recipe but you will get the inspiration to create different kinds of bread, too.


Cheese And Salami Twists
Makes 6

200 g
Bread Flour
3 g
Instant dried yeast
20 g
Sugar
3 g
Salt
20 g
Unsalted butter (soft)
140 g
whole milk
40 g
Salami cut into small pieces
40 g
Mozzarella cheese, shredded

Mayonnaise


Put the flour, the sugar and yeast in a bowl, whisk to combine, add and salt whisk again. Pour the milk into the bowl.


Use large spoon (or pastry scraper) to mix everything together, and knead briefly to bring all the ingredients together.


Take the dough out of the bowl and knead, you will see the dough will be elastic after about 2 minutes.


Add the butter and knead by using the heel of your hands to compress and push the dough away from you, then fold it back over itself. Give the dough a little turn and repeat. Put the weight of your body into the motion and get into a rhythm. Keep folding over and compressing the dough. Knead for 10-15 minutes or until the dough is soft, pliable, smooth and slightly shiny, almost satiny.


Or you can also try stretching part of the dough, if it can stretch into a thin sheet without breaking, you've kneaded enough.

Put the dough into a light buttered bowl. Let the dough rise in a warm place until double in size (can be 1 hour or 1 hour and a half check often depend on the temperature).
Take the dough out of the bowl, deflate by touch it lightly.

Roll the dough into rectangular, 30 cmx25 cm. Sprinkle the salami and cheese on top of the half part of it, and fold the other part over the salami and cheese.
Seal the side of the dough and push the rolling pin over (not to roll but the make the salami and cheese stick to the dough).

Cut the dough into 6 pieces (using ruler to guide you ).

Cut the piece in the middle and fold one of the end into the middle of the cut, do it 2 times to form a twist.

Place the dough on the oven sheet, lined with non stick baking paper (the cheese will melt while baking and some will leak).


Preheat the oven to 180°C. Let the dough rise until almost double in size, (about 30 minutes).
Before put them in the oven, squeezes the mayonnaise over the bread.

Bake for 10-12 minutes or until the breads are golden brown.


Cheese and Salami Twists

Printfriendly

Related Posts Plugin for WordPress, Blogger...