Saturday, April 3, 2010

Cheese, Onion and Potato Pie: Ultimate comforting dish!


This one is my favorite, a warm dish that full of comforting food ^ ^. Each spoonful, you will find delicious mashed potato with the sweet sautéed onion and the cheese.

I love soft food (well, I told you before, hehe, that I love baby food), so I can't wait to try anything like this. Anyway this is my second time for this dish,  I love the creaminess of the mashed potato that goes very well with the cheese.
You can serve this dish as a main (which is very good for me), with a bowl of soup, it will be your ultimate comfort menu.
Even the name of the dish says pie, I just have to say that , it's a baked mashed potato with onion and cheese (it's longer, but easier to understand, right?)


When mashing the potato, I use the hand mixer (this method is from Delia Smith and I stuck to this way ever since) it's easier, quicker and smoother, you can use this method when making the simple mash too (but if you like your mashed potato to be a bit chunky, it's not for you, ^ ^).
This dish can be prepared ahead of time, and when you want to serve just place the tomato and sprinkle the cheese on top and put it in the oven and bake until it's golden brown.
Easy and delicious food is not hard to make, well, now I can say this, haha.


Cheese, Onion and Potato Pie
* serves two generously 
(I must say, you have to be very very hungry to finish it, haha, I serve 4)
takes about 45 minutes to make


750g .................................. potatoes, peeled and quartered
40g .................................... butter
1 ......................................... large onion, thinly sliced
100ml ................................ milk
200g .................................. mature Cheddar, Double Gloucester or Red Leicester cheese, grated
50g .................................... Mozzarella cheese, grated
1 teaspoon ........................ wholegrain or English mustard
............................................ sea salt and freshly ground black pepper
1-2 ..................................... tomatoes, sliced


Preheat the oven to 200°C/fan 180°C/gas 6.


Cook the potatoes in boiling salted water for 15 to 20 minutes until tender. Drain the potatoes and return back to the pan. Mash really well with a potato masher (dailydelicious note: I use hand mixer, which is very quick and efficient).
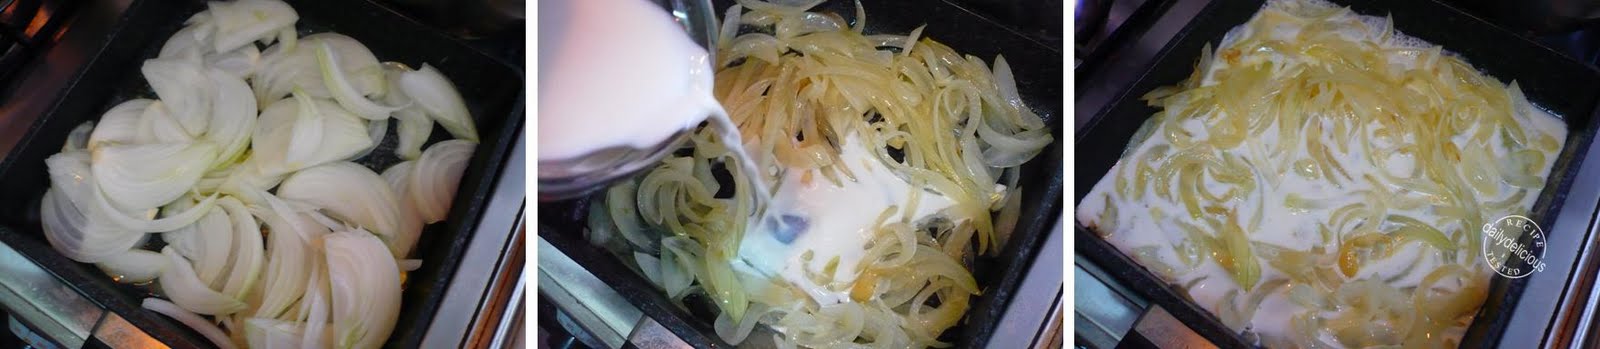


While the potatoes are cooking, melt the butter in a pan and gently saute the onion until lightly golden and sweet. This will take about 10 minutes. Add the milk to the pan and heat until almost boiling.


Then beat the milk and onion, three-quarters of the cheddar cheese, the mustard and some seasoning into the mashed potato.


Transfer to a buttered ovenproof dish, lay the tomato slices on top and scatter over the remaining cheddar and mozzarella cheese.
Bake for 20 to 25 minutes until the top is bubbling and lightly golden.


Cheese, Onion and Potato Pie: Ultimate comforting dish!

Tuesday, March 30, 2010

Date Nut Bread with Cream Cheese: The best and delicious way to use Date!


Like most of the dried fruit, date is very sweet, and it's a problem, haha. Because even I like to eat them, a lot of it will make me feel dizzy. I have a lot of it in my fridge, due to the fact that, first, I like to buy it and second, everyone like to buy it for me, ^ ^ . So I end up with the fridge full of this sweet fruit.


Most of the recipe will turn this sweet fruit into the sweet cake (or pudding), which is not what I want, I want to find the way to tame the sweetness not adding more of it.
So the journey to the great recipe begin,  in my room by browsing through the pile of cookbooks again, haha (well, you know that I just want to use the recipe in my books, so I feel less guilty when I buy more book, ^ ^, because I can say that I use it, right?).
Finally, I find it, it's the quick bread recipe in the book. I just got it, haha  from my last trip to the bookstore and really want to try some recipe and this Date Nut Bread with Cream cheese is very interesting.

The most of  sweetness of this bread comes from the date, itself more than the sugar (the sugar still needed as it act as a softener for the cake), and the nut helps reducing the sweetness too. But most of it is the way we eat, when spread the bread with the cream cheese, the bread transform from very sweet bread into the mellow bread. The tangy and creamy of the cream cheese make the bread less sweet and add a lot of the creaminess (as you can see that the bread use very little oil and it's a bit dry).

For this bread, the cream cheese is a must when serving, and or I can say that a lot of it will be the best, haha. When I ate the bread alone (when tasting it), I have to say that I didn't like it, the sweetness make me feel bad, but when cream cheese added, the bread is very delicious. 
When sandwich this bread together with (a lot of, haha) cream cheese, and serve it with a cup of strong coffee or tea, it can be your breakfast or a tea time treat, and yes, a very delicious one that you will love it too.


Date Nut Bread with Cream Cheese
Yield 1 loaf (9 x 5 inch) 


INGREDIENTS
175g ............................ Dates, diced
340ml ......................... Boiling water
110g ............................ Light brown sugar
50g .............................. Sugar
30ml ............................ Vegetable oil
1 ................................... Egg
310g ............................ Unbleached alI-purpose flour
15g .............................. Baking powder
6g ................................ Kosher salt
115g ............................ Walnut pieces, toasted 
..................................... Cream cheese (for spreading on slices)

1. Position one rack in the middle of the oven, and preheat the oven to 350°F. Grease the loaf pans.


2. In a medium bowl, cover the date pieces with the boiling water and set aside.


3. In another bowl, combine the brown sugar, sugar, oil, and eggs.


4. In a separate bowl, add the flour, baking powder and salt and whisk together. Pour the sugar mixture and the date mixture onto the dry ingredients and fold together until almost mixed. Add the walnuts and stir until just combined.


5. Pour the batter gently and evenly into the prepared loaf pans. Bake for 55 to 65 uiinutes, or until a toothpick inserted in the middle of the loaf comes out clean. Do not overbake.
6. Cool the loaves in the pans for 15 minutes, then turn them out and place on a wire rack to cool completely. This bread has a crunchy crust and stays fresh for several days. Enjoy it soon after baking and avoid wrapping it in plastic film until one day later, to preserve the crunchy crust. Store the loaves at room temperature unwrapped or refrigerate after wrapping. This bread freezes well wrapped in plastic film and then foil.
7. Serve each slice with an ounce (30g) of cream cheese for a delicious and satisfying treat.


Date Nut Bread with Cream Cheese: 
The best and delicious way to use Date!

Saturday, March 27, 2010

March 2010 Daring Bakers Challenge #38: ORANGE TIAN


Time is flying, it's the end of month again, haha, so I both have a lot of work to do and a lot of things to bake, ^ ^.
Ok, I felt a bit lazy lately, or actually just after reading the recipe for this month challenge, hahaha. I start to feel that most of the recipe for each month seen to get longer and longer ^ ^ but it's the challenge, so easiness is not welcome, right?

This time we have to make all the components for this dessert, the Pate Sablee, the Marmalade, the caramel soaked orange, the whipped cream and the orange caramel. I really like the idea of making the  Marmalade but I had a little problem again, I just couldn't find the pectin (actually, I waited for the shop to send this item to me, but at last they couldn't send it on time), so, I had to make the jam without using it.
But the results is not bad at all, even without the pectin, my Marmalade is great (now I know how to make it, I think about making it again with less sugar).
The dessert is delicious but it's not an eye opening one, I should use more tangy citrus (like the combination of lemon or grapefruit) to make the flavor more interesting and more complex. But for the people who love orange this dessert must get their heart, I really believe!

Anyway, this time it's a great challenge again (I'm happy to be one of the Daring Bakers member, esp, when I'm not in my lazy mood, haha). Like any dessert with a lot of components, just manage your time wisely and every kinds of dessert is easy! 


The 2010 March Daring Baker’s challenge was hosted by Jennifer of Chocolate Shavings. She chose Orange Tian as the challenge for this month, a dessert based on a recipe from Alain Ducasse’s Cooking School in Paris.


THE DARING BAKERS MARCH 2010 CHALLENGE - ORANGE TIAN
Makes 6 (8.8 cm/ pieces)


For the Pate Sablee:
dailydelicious note: If you make only 6 pieces like me, you can make only half the recipe.


Ingredients U.S. Imperial Metric Instructions for Ingredients
2 medium-sized egg yolks at room temperature
granulated sugar 6 tablespoons + 1 teaspoon; 2.8 oz; 80 grams
vanilla extract ½ teaspoon
Unsalted butter ¼ cup + 3 tablespoons; 3.5 oz; 100 grams ice cold, cubed
Salt 1/3 teaspoon; 2 grams
All-purpose flour 1.5 cup + 2 tablespoons; 7 oz; 200 grams
baking powder 1 teaspoon ; 4 grams


Directions:


Put the flour, baking powder, ice cold cubed butter and salt in a food processor fitted with a steel blade.
In a separate bowl, add the eggs yolks, vanilla extract and sugar and beat with a whisk until the mixture is pale. Pour the egg mixture in the food processor.
Process until the dough just comes together. If you find that the dough is still a little too crumbly to come together, add a couple drops of water and process again to form a homogenous ball of dough. Form into a disc, cover with plastic wrap and leave to rest in the fridge for 30 minutes.


Preheat your oven to 350 degree Fahrenheit.


Roll out the dough onto a lightly floured surface until you obtain a ¼ inch thick circle.
Using your cookie cutter, cut out circles of dough and place on a parchment (or silicone) lined baking sheet. 


Bake for 20 minutes (dailydelicious note: I use 15 minutes)or until the circles of dough are just golden.


For the Marmalade:


Ingredients U.S. Imperial Metric Instructions for Ingredients
Freshly pressed orange juice ¼ cup + 3 tablespoons; 3.5 oz; 100 grams
1 large orange used to make orange slices
cold water to cook the orange slices
pectin 5 grams
granulated sugar: use the same weight as the weight of orange slices once they are cooked


Finely slice the orange. Place the orange slices in a medium-sized pot filled with cold water. 


Simmer for about 10 minutes, discard the water, re-fill with cold water and blanch the oranges for another 10 minutes.
Blanch the orange slices 3 times. This process removes the bitterness from the orange peel, so it is essential to use a new batch of cold water every time when you blanch the slices.
Once blanched 3 times, drain the slices and let them cool.


Once they are cool enough to handle, finely mince them (using a knife or a food processor).
Weigh the slices and use the same amount of granulated sugar . If you don’t have a scale, you can place the slices in a cup measurer and use the same amount of sugar.
In a pot over medium heat, add the minced orange slices, the sugar you just weighed, the orange juice and the pectin. Cook until the mixture reaches a jam consistency (10-15 minutes).
Transfer to a bowl, cover with plastic wrap and put in the fridge.


For the Orange Segments:


For this step you will need 8 oranges. 


dailydelicious note: If your orange is big (like mine, about 220-240g/orange), you may use only 4.


Cut the oranges into segments over a shallow bowl and make sure to keep the juice. Add the segments to the bowl with the juice.


For the Caramel:


Ingredients U.S. Metric Imperial Instructions for Ingredients
granulated sugar 1 cup; 7 oz; 200 grams
orange juice 1.5 cups + 2 tablespoons; 14 oz; 400 grams


Place the sugar in a pan on medium heat and begin heating it.
Once the sugar starts to bubble and foam, slowly add the orange juice. As soon as the mixture starts boiling, remove from the heat and pour half of the mixture over the orange segments.
Reserve the other half of the caramel mixture in a small bowl — you will use this later to spoon over the finished dessert. 


[Tip: Be very careful when making the caramel — if you have never made caramel before, I would suggest making this step while you don’t have to worry about anything else. Bubbling sugar is extremely, extremely hot, so make sure you have a bowl of ice cold water in the kitchen in case anyone gets burnt!]

For the Whipped Cream:


Ingredients U.S. Metric Imperial Instructions for Ingredients
heavy whipping cream 1 cup; 7 oz; 200 grams
3 tablespoons of hot water
1 tsp Gelatine
1 tablespoon of confectioner's sugar
orange marmalade (see recipe above) 1 tablespoon


In a small bowl, add the gelatine and hot water, stirring well until the gelatine dissolves. Let the gelatine cool to room temperature while you make the whipped cream.


Combine the cream in a chilled mixing bowl. Whip the cream using a hand mixer on low speed until the cream starts to thicken for about one minute. Add the confectioner sugar. Increase the speed to medium-high. Whip the cream until the beaters leave visible (but not lasting) trails in the cream, then add the cooled gelatine slowly while beating continuously. Continue whipping until the cream is light and fluffy and forms soft peaks.


 Transfer the whipped cream to a bowl and fold in the orange marmalade.
[Tip: Use an ice cold bowl to make the whipped cream in. You can do this by putting your mixing bowl, cream and beater in the fridge for 20 minutes prior to whipping the cream.]


Assembling the Dessert:


Make sure you have some room in your freezer. Ideally, you should be able to fit a small baking sheet or tray of desserts to set in the freezer.
Line a small tray or baking sheet with parchment paper or a silicone sheet. Lay out 6 cookie cutters onto the parchment paper/silicone.


Drain the orange segments on a kitchen towel.
Have the marmalade, whipped cream and baked circles of dough ready to use.
Arrange the orange segments at the bottom of each cookie cutter. Make sure the segments all touch either and that there are no gaps. Make sure they fit snuggly and look pretty as they will end up being the top of the dessert. Arrange them as you would sliced apples when making an apple tart.


Once you have neatly arranged one layer of orange segments at the bottom of each cookie cutter, add a couple spoonfuls of whipped cream and gently spread it so that it fills the cookie cutter in an even layer. Leave about 1/4 inch at the top so there is room for dough circle.
Using a butter knife or small spoon, spread a small even layer of orange marmalade on each circle of dough.
Carefully place a circle of dough over each ring (the side of dough covered in marmalade should be the side touching the whipping cream). Gently press on the circle of dough to make sure the dessert is compact.
Place the desserts to set in the freezer to set for 10 minutes.


When the dessert is assembled and setting in the freezer, heat the kept caramel sauce in a small saucepan over low heat until it thickens and just coats the back of a spoon (about 10 minutes). You can then spoon it over the orange tians.


Using a small knife, gently go around the edges of the cookie cutter to make sure the dessert will be easy to unmold. Gently place your serving plate on top of a dessert (on top of the circle of dough) and turn the plate over. Gently remove the cookie cutter, add a spoonful of caramel sauce and serve immediately.


March 2010 Daring Bakers Challenge #38 : ORANGE TIAN

Printfriendly

Related Posts Plugin for WordPress, Blogger...