Monday, September 27, 2010

September 2010 Daring Bakers Challenge #44: Get Creative!, My rainy and sunny day

"The sunny day"


Actually I don’t have any special occasion on September ^^. But when the host of this month challenge (Mandy of “What the Fruitcake?!”), want all of us to get creative, I have to think about it again.


September is in the rainy season (but most of the time, I think Thailand has only summer season all year, haha), it’s raining almost every day. Even I love the smell and the refreshing feeling of after  the rain, but before raining the weather is the worst.

So, for me all I can think of this month is “Rain, rain and rain”, and I choose it as a theme for my creative decorating cookie. I start with the rain, that falling down and make all the place wet, everywhere is filled with mushroom ^^ (and all my mushrooms are edible, haha), and the snails are crawling across the lawn
But after that, when it’s stop, the sun will shine, the butterfly will begin to take the scene, they will fly all over the place ^^, and yes the mushroom still here to be our natural food!


This cookie is very easy to make and hold its shape very well, the cookie dough will be soften after taking out of the fridge but it’s not very fast. I have other recipe for cut out cookie that melt very easily, so if you are baking cookie for decorating, this recipe will be great. The taste of the cookie is good but accept it, it will become sweeter after you put the icing on ^^. Anyway I love it and have a lot of fun making these little rain drop, haha, so thank you Mandy of “What the Fruitcake?!”.
Let’s take a look at my creative cookie, hope all of you enjoy it, and for me I hope that tomorrow it will be a sunny day, again!

The September 2010 Daring Bakers’ challenge was hosted by Mandy of “What the Fruitcake?!” Mandy challenged everyone to make Decorated Sugar Cookies based on recipes from Peggy Porschen and The Joy of Baking.


"The rainy day"


"The mushrooms"


Basic Sugar Cookies
Makes Approximately 36x 10cm / 4" Cookies


200g / 7oz / ½ cup + 6 Tbsp Unsalted Butter, at room temperature
400g / 14oz / 3 cups + 3 Tbsp All Purpose / Plain Flour
200g / 7oz / 1 cup Caster Sugar / Superfine Sugar
1 Large Egg, lightly beaten
5ml / 1 tsp Vanilla Extract / Or seeds from 1 vanilla bean

a pinch of salt


Directions
• Cream together the butter, sugar, salt and any flavourings you’re using. Beat until just becoming
creamy in texture.
• Tip: Don’t over mix otherwise you’ll incorporate too much air and the cookies will spread during
baking, losing their shape.
• Beat in the egg until well combined, make sure to scrape down the sides of the bowl.


Add the sifted flour and mix on low until a non sticky dough forms.
• Knead into a ball and divide into 2 or 3 pieces.


• Roll out each portion between parchment paper to a thickness of about 5mm/1/5 inch (0.2 inch)
• Refrigerate for a minimum of 30mins.
• Tip: Recipes commonly just wrap the whole ball of dough in clingwrap and then refrigerate it for an hour or overnight, but by rolling the dough between parchment, this shortens the chilling time and then it’s also been rolled out while still soft making it easier and quicker.
• Once chilled, peel off parchment and place dough on a lightly floured surface.
• Cut out shapes with cookie cutters or a sharp knife.
• Arrange shapes on parchment lined baking sheets and refrigerate for another 30mins to an hour.
• Tip: It’s very important you chill them again otherwise they’ll spread while baking.
• Re-roll scraps and follow the above process until all scraps are used up.
• Preheat oven to 180°C (160°C Fan Assisted) / 350°F / Gas Mark 4.
• Bake until golden around the edges, about 8-15mins depending on the size of the cookies.
• Tip: Bake same sized cookies together otherwise mixing smaller with larger cookies could result in some cookies being baked before others are done.
• Tip: Rotate baking sheets half way through baking if your oven bakes unevenly.
• Leave to cool on cooling racks.
• Once completely cooled, decorate as desired.


decorator's icing

3 tablespoons
meringue powder
6 tablespoons
warm water
1-pound
confectioners' sugar


In the bowl of an electric mixer, using the whisk attachment beat the meringue powder; water; and confectioners' sugar at medium-low speed until the icing forms stiff peaks, about 7 minutes. Thin the icing to the consistency you want by adding a little warm water, a few drops at a time.


Thin some of the icing with water (adding it drop by drop) until it's thin enough to pipe the smooth line.
In another bowl thin some of the icing with water (adding it drop by drop) until it does not leave a trail when it drops from a spoon.

Outline the cookie and pour the thiner icing over the center. Spread the icing over the cookie .
Let the icing dry before decorating with more icing.


September 2010 Daring Bakers Challenge #44: 
Get Creative!, My rainy and sunny day

Friday, September 24, 2010

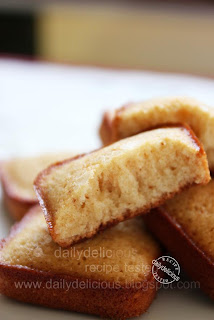
Salted Financier: Delicious salty sweet tea companion


Salt is the ingredient that we rarely use in the dessert or sweet, most of the time, we use a tiny amount of it to bring out other flavor (a bit of salt will balance the flavor).

I think salt is very important, so, most of the time when I see the recipe without the salt in the ingredient list I will add it ^^. But this time the salt is not come as the flavor helper, it’s the main flavor!
This financier has saltiness as the key, and it’s great! Everyone who tastes it told me that they are surprise by the taste; the sweetness and the saltiness come along together so well that they just can’t stop eating it.
The only change that I make for this time is the kind of salt, while the book suggest the “fleur de sel” I have only the Maldon sea salt, so I use what I have, haha. So, if you don't have any kind of the salt that I talk about, just use any sea salt that you have on hand.

The recipe come from ........................ I really like this book, because most of the dessert and baked goods in this book are easy to make at home while some of them have look great enough to be a show stopper, but anyway we will talk about the book later, haha.


I really want everyone to this recipe, because you will wander how salt can turn simple little cake into something very special ^^.
The taste of this financier is salty sweet, it’s great to serve this little cake with a cup of hot tea (the Chinese tea is a good companion), and be prepared your guest may think they never have enough of it.


Salted Financier
Makes 10 (6.2x6.2cm individual brownie pan)


15g .................................Almond powder
30g ................................ Hazelnut powder
113g .............................. Icing sugar
45g ................................ Cake flour
2g .................................. Salt
113g .............................. Butter
113g .............................. Egg white
11g ................................ Invert sugar (or honey ) 
....................................... Maldon sea salt 


Put the butter into saucepan and melt over medium heat, then lower the heat and let the butter brown (you can see that the milk segment will turn into brown bit).
Let the butter cool (you can speed this process by place the saucepan over the ice bath).


Preheat the oven to 150°C then roast the almond and hazelnut powder for 15 minutes.
Let the nut powder cool a bit before using it.
Meanwhile turn up the heat to 230°C.


Sift the roasted nut powder with flour and icing sugar.
Pour half of the egg white into the flour mixture.


Put the rest of the egg white into a bowl; pour the invert sugar (or honey) into the bowl. Place the bowl over warm water, stir the mixture until the temperature turn into 40°C, and the invert sugar melted.


Brush the pan with butter.

Pour the egg white mixture into the flour mixture, follow by the melted butter, stir to combine.
Divide the batter into the prepared pan, and sprinkle with the salt.
Put the pan into the oven and turn down the heat to 190°C.
Bake for 16 minutes or until the financier is brown.


Salted Financier: Delicious salty sweet tea companion

Monday, September 20, 2010

Chocolate Brownies: My deep and darkness passion!


I think even I don't say it, everyone know that I love chocolate. How can you resist it? The richness, the bitterness, and the smell of it alway blow my heart away ^^.


So, I always end up with making all the baking from it or just eat a little piece of the chocolate everyday. And today is the same, last night I went to bed with the feeling of longing for the chocolate, then when I wake up all I want to do is making a "Chocolate brownies".
But this one is not the same as the one that I make before, because I make "chocolate brownies" the famous brownies from the place where I went to have lunch with my friend on my vacation. The chocolate brownie is very rich and delicious, I really want to create it in my home. 


As usual, when making any kind of chocolate dessert, I really recommend you to use the chocolate that your love to eat, because the flavor of the chocolate will be the main flavor of the dessert. This time, I use 70% dark chocolate, but if you love your brownies to be less intense, you can use less percentage, so keep in mind that this is your brownie, what do you want it to taste like, haha.
My brownie is deep in flavor and dark in appearance ^^, but if you ask me "Do you like it?" I will reply you that "I love it". So, for your darkness passion, why don't you make one for yourself and have a happy time like me.


Chocolate brownies
Makes 1 (20x20cm square)


125g ................................ Butter
100g ................................ Dark chocolate 
75g ................................... Chopped nut
40g .................................. Cocoa powder
30g .................................. All purpose flour

½ tsp .............................. Baking powder
175g ................................. Caster sugar
2 ....................................... Eggs


Preheat your oven to 180°C/350°F/gas 4. Line a 20cm/8 inch square baking tin with greaseproof paper. 


In a large bowl over some simmering water, melt the butter and the chocolate and mix until smooth. 
Then remove from the heat.


Add the nuts and stir together. In a separate bowl, mix together the cocoa powder, flour. baking powder and sugar, then add this to the chocolate mixture, stir together well. Beat the eggs and mix in ulitil you have a silky consistency.


Pour your brownie mix into the baking tray, and place in the oven for around 20 minutes.  The brownies should be slightly springy on the outside but still gooey in the middle. Allow to cool in the tray, then carefully transfer to a large chopping board and cut into chunky squares. 


Chocolate Brownies: My deep and darkness passion!

Wednesday, September 15, 2010

Chicken Farm Baker's Project # 26 : Jam and bake .... spoil yourself with mouthwatering jam.


For this month, we don't only bake, but we make a jam too. Due to the fact that my friend who live in Italy, have to make jam every years,  she has an idea that we should try this kind of art too.
It's the beginning of this project :Chicken Farm Baker's Project # 26 : Jam and bake .... spoil yourself with mouthwatering jam. As always, I have no idea, haha, what I should do. Because I rarely make a jam by myself (well, I have my love for seedless raspberry jam but it's easier to buy than making it, ^^). 
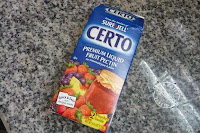
Anyway, I have to make one jam, and luckily I got a box of pectin from one of my friend (Khun Naung, she sent me a box of it after knowing that I didn't have it ^^). So this is a chance to use it, right? I read the instruction inside the box and saw this recipe, the strawberry and blueberry jam, I think it's a good one to try. 


The first batch is a disaster, >*<, because I reduced too much sugar from an original recipe, and the jam didn't set, it look like a soup, haha! So, I have to do it again, this time I reduce only 30% from the original recipe and boil it longer. It's a precaution for anyone who want to make jam, if you  want to use less sugar, you may have to buy the pectin with the label like "less sugar" or your jam won't set at all. 
But if you don't use any kind pectin, you may have to boil the fruit longer to thicken it. 


For the bake, I choose to make Danish loaf, the one that I had tried it when I went to Singapore last year (so sad that this shop was gone), and I really want to make it ever since.
I saw an easily recipe for making Danish loaf in Japanese website (actually it's a shop website, they give the recipe for promote their product). I think it's a good recipe and very easy to follow, the results is quite good and the preparing time is shorter than other Danish bread recipe.
So, this is my Jam and Bake, a delicious and easy to make Danish loaf with sweet and fragrance Strawberry and blueberry jam, that I hope you will love them too.


Strawberry and Blueberry Jam


300g ................................. Strawberry
300g ................................. Blueberry
500g ................................. Sugar
........................................... Juice from 1 lemon
............................................ Pectin (1 pouch) - optional 


-The pectin that I use-


Crush the fruits with potato ricer (don't puree it), and put them in the saucepan.
Pour the sugar and lemon juice into the pan and bring to rolling boil for 5 minutes.
Pour the pectin into the pan, stir quickly and bring to rolling  boil for 5 minutes.
Pour the jam into clean box (or sterilized jar if you want to keep it for a long time).
Note: If you don't have pectin, you may have to boil it longer to thicken it.  


-My Strawberry and Blueberry Jam-


Danish Loaf
Make 2 small loaf (60X250X60mm/1 loaf)


50g .................................. All purpose flour
180g ................................ Bread flour
18g .................................. Sugar
4g .................................... Salt
5g .................................... Instant dry yeast
8g .................................... Milk powder
20g .................................. Unsalted butter
1 ...................................... Egg yolk
140g ............................... Water


100g ............................... Unsalted butter (for folding)


Mix flours, sugar milk powder and yeast together, put the salt into the bowl and whisk to combine.
Pour the water and egg yolk into the bowl and mix to combine.
When the dough is moisten, take it out of the bowl and knead until smooth.
Knead the butter into the dough.


The dough will be soft and smooth, but will be a bit sticky.
Let the dough rise in room temperature for 20 minutes, then refrigerate for 15 minutes.


Roll the dough into 20x20 cm square and place the butter on the dough, cover with the dough and seal it.
Start by pressing down the dough with the rolling pin before rolling the dough into a rectangle 1 cm thick ( to prevent the leakage if the butter). Roll the dough into rectangular about 35-40 cm long.
Give the dough the first single turns by fold the bottom third of the rectangle up toward the centre, carefully aligning the edges. Fold the top third down to make a neat square and brush off any flour. Refrigerating it for approximately 30 minutes. Be sure the dough is well covered at all times.


Roll the dough again into rectangular about 35-40 cm long.
Give the dough the second turns by fold the bottom third of the rectangle up toward the centre, carefully aligning the edges. Fold the top third down to make a neat square and brush off any flour. Refrigerating it for another 30 minutes. 


Butter the pans and set aside.
Roll the dough into 30x30 cm square, and cut the dough in half.
Roll each half into a cylinder then cut the cylinder in half.
Twist the ropes together to form a rope.


Preheat the oven to 200°C 
Put the rope into the pans, and let rise in room temperature for 1 hour.
Bake for 20 minutes or until golden brown.

-Danish Loaf-

Chicken Farm Baker's Project # 26 :
 Jam and bake .... spoil yourself with mouthwatering jam
Strawberry and Blueberry Jam with Danish Loaf

Friday, September 10, 2010

Ham and Spring Onion Muffin: For your lazy Sunday brunch!


For your lazy Sunday brunch, may I suggest  "Ham and Spring Onion Muffin". Actually, I love muffin, it's very easy to make and a warm muffin will warm your heart too.


Making the muffin is so easy, you can prepare everything in advance and put them in the fridge and mix them together when you wake up, and it takes only 18-20 minutes to bake!. So, it's one of the quickest homemade breakfast. I got this recipe from the .............  magazine (UK edition, issue: August 2010, the same one that I use the frosting recipe for flower carrot cake).
And at that time I had my eyes on this muffin too, but well, I'm still on my vacation and I didn't have to make my own breakfast, haha. So, right now, when I have to bake well, I choose to make this one, ^^.

For anyone who afraid of the word over-mix (or anything that most of the cookbook warm you), the only thing that you have to pay attention is just fold until your wet and dry batter look almost combine, a few spot of flour is Ok.
That the key for making soft muffin, you don't have to stir until all of them turn into sticky batter, because if that happens, your muffin will be tough.
So, for this weekend you don't have to wake up early, and you still have a delicious muffin for breakfast, it's great right?


Ham and Spring Onion Muffins
Makes 7 


180g ............................... All purpose flour
1tsp ................................ Baking powder
½tbsp ........................... Caster sugar
¼tsp ............................. Salt
50ml .............................. Vegetable oil
1 ..................................... Egg
100ml ............................ Sour cream
50ml ............................... Milk
50g .................................. Ham, finely diced
40g .................................. Cheddar, diced, plus extra, grated, to sprinkle
3 ...................................... Spring onions, sliced

Preheat the oven to 180°C
Line 7 muffin tins with paper case.


Sift the flour, baking powder, sugar, and salt into a large bowl.
Whisk together the oil, egg, sour cream, and milk, then fold into the flour. Fold in the ham, Cheddar and spring onion. Don’t over-mix.


Divide the mixture evenly among the muffin cases. Sprinkle over the extra grated Cheddar, then bake for 18-20 minutes until risen, golden and springy to touch. Allow to cool before serving.


Ham and Spring Onion Muffin: 
For your lazy Sunday brunch!

Printfriendly

Related Posts Plugin for WordPress, Blogger...