Wednesday, June 30, 2010

Caramel Buttercream and Maple syrup layers Cake: The must try cake for the caramel lover!

You might notice that I have a lot of caramel related recipe, well you can blame my sister ^^. Every time that I talk about the recipe that contain caramel or have a caramel in its name, she will tell me to make it, haha.  
This time, sine I got the book about a month ago, and I told her that I bought this book because of her, she asked for something from the book. Ok, I can tell you the truth that I really bought it for myself, ^^", but it will be better when you said that kind of thing, right? So, I needed to do something!


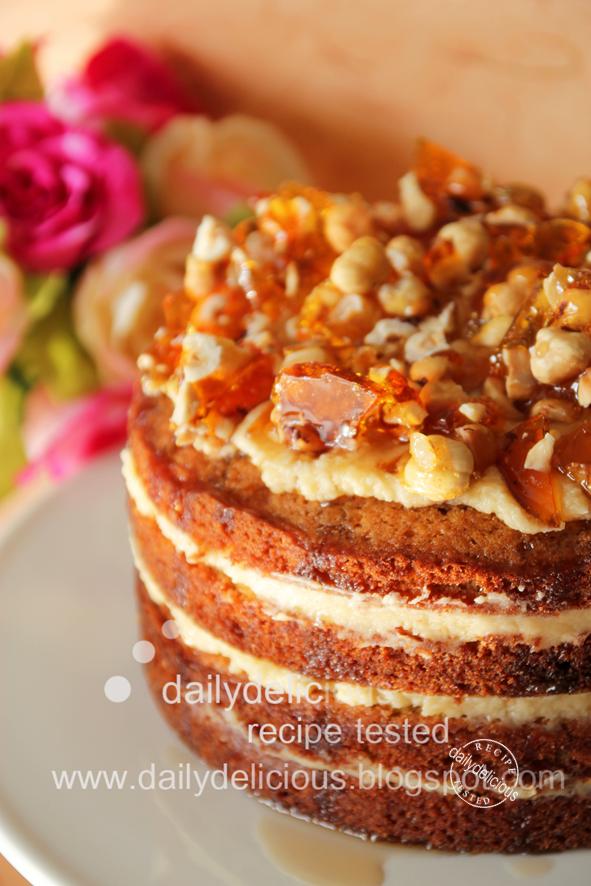
But it's not hard for me to choose the recipe that I want to try, this book is full of yummy idea (both easy and hard, and for the dessert or food!). I choose the recipe that catch my eyes most,The Caramel Buttercream and Maple syrup layers Cake. The reason for this cake is simple, first it's look good, haha and can be a show piece (esp. when you want to show off), second, it's easy. 
All the hazelnut praline will make the people say "Wow", even it's easy to make (real easy, but the only thing is you have to be caution, like every time that you work with the caramel, it's so so hoooooooot).


I adjust the recipe to suit my family (well, I bake almost everyday, so you can imagine that I need the cake to be small enough to finish real soon, ^^) and my taste, and the key is the buttercream. I add a lot of the mascarpone and I think I love it, ^^, the only down side is the texture of the buttercream is not smooth. But don't worried, it won't effect the taste, when you eating it, all of them will melt into lovely rich buttercream, and I know that you will believe me that it's better to taste good than looking perfect, haha.


CARAMEL BUTTER CREAM AND MAPLE SYRUP LAYER CAKE
Make 18cm (4layers cake)


For the cake
200g ................................. all-purpose flour 
160g .................................. soft brown sugar
80g .................................... white superfine sugar 
4 ........................................ eggs 
250g .................................. salted butter, softened 
1tsp ................................... baking powder


For the caramel butter cream 
220g .................................. icing (confectioner's) sugar
125g ................................... butter, softened 
2tbsp .................................. liquid caramel 
............................................. (store-bought, or you can make by yourself from, here)
140g ................................... mascarpone


For the caramelized hazelnuts 
40g ..................................... hazelnuts, shelled and toasted (in the oven or in a skillet) 
15 ml .................................. water
85g ..................................... granulated sugar 


40 ml ................................. maple syrup


Preheat tne oven to 180°C.
Grease and flour two 18cm. sponge pans. 
Sift the flour and baking powder together, set aside.


Beat the butter 2 kinds of sugar, add the eggs and all the flour mixture, fold to combine. with 
Divide the mixture between the pans and bake in the oven for 25 minutes or until the surface of the cakes is golden brown.


Check they are cooked by inserting the blade of a knife into the center, it should comes out clean.
Remove the cakes from the oven and leave to stand for a few minutes before turning  them out of the pans and leaving to cool completely on wire rack.


 To make the butter cream, beat the sugar and soften butter until the mixture is smooth. Add the caramel and mascarpone to slacken and froth up the butter cream. Allow to set in the refrigerator for a few minutes, if necessary. 


Make the caramelized hazelnut 
Spread the hazelnut on a silicone liner. Boil the water ard sugar until they turn into amber  and pour over the hazelnuts, and leave to set.  Then break the caramelized hazelnut praline into pieces.


Cut each cake in half to obtain 4 rounds.
Spread the buttercream on each of 3 cake rounds,reserving a larger for the topping. Place the rounds one on top of the other, adding the extra portion of the buttercream to the top layer and leave to set.
Use the praline to decorate the cake. Just before serving, drizzle the maple syrup over cake and let it run down the sides. 


Caramel Buttercream and Maple syrup layers Cake: 
The must try cake for the caramel lover!

Sunday, June 27, 2010

June 2010 Daring Bakers Challenge #41: Chocolate Pavlovas with Chocolate Mascarpone Mousse


This month the Daring Bakers take us to the world of chocolate again ^^.
As I love the chocolate and the mascarpone, this dessert is quite tempting for me. 


But there was some problem as I start to make it last week, first I had a cold (and I just couldn't get up), second my niece had a cold too, and it's a big problem, because me, my mom and my sister had to be with her in the hospital! Luckily, she is recovering now, so I can be back home too, ^ ^.
But some of the bad luck still stuck on me, -*-, I bought the fruit for this dessert (as I think that the chocolate only is not the best choice, having some fruit will make it more tasty), but I forgot to take it home. So, I had to wait until my brother go to the supermarket again, before I can start. And I just finished making it yesterday !!!

Talk about the dessert, well, it's great as it should be, the pavlova is easy to make and taste good. But I found it a little bit chewy when I eat it with the mousse. I don't why and I just don't have time to make it a second time.
The mousse taste great if you love chocolate (but for the people who don't like chocolate much, they will find it too bitter), anyway, beware when you add the melting chocolate to the other ingredients, don't let the chocolate cool too much (a bit warm is OK) or the mousse will be grainy.   

I make only have of the recipe for the mascarpone drizzling sauce, which I think it's enough. And I pair this rich dessert with the raspberry, which is great ^ ^, because even the raspberry is sweet it give this dessert a feeling of refreshing too.
So, if you ask me about this month challenge, I have to say if you the one who love chocolate as much as me, you will say "yummy" too.

   The June 2010 Daring Bakers’ challenge was hosted by Dawn of Doable and Delicious. Dawn challenged the Daring Bakers’ to make Chocolate Pavlovas and Chocolate Mascarpone Mousse. The challenge recipe is based on a recipe from the book Chocolate Epiphany by Francois Payard


Chocolate Pavlovas with Chocolate Mascarpone Mousse
serves 4 


 Chocolate Meringue (for the chocolate Pavlova):


3 large egg whites
½ cup plus 1 tbsp (110 grams) white granulated sugar
¼ cup (30 grams) confectioner’s (icing) sugar
1/3 cup (30 grams) cocoa powder


Directions:
1. Place a rack in the center of the oven and preheat to 200º F (95º C) degrees. Line two baking sheets with silpat or parchment and set aside.
2. Put the egg whites in a bowl and whip until soft peaks form. Increase speed to high and gradually add granulated sugar about 1 tbsp at a time until stiff peaks form. (The whites should be firm but moist.)
3. Sift the confectioner’s sugar and cocoa powder over the egg whites and fold the dry ingredients into the white. (This looks like it will not happen. Fold gently and it will eventually come together.)
4. Fill a pastry bag with the meringue. Pipe the meringue into whatever shapes you desire. Alternatively, you could just free form your shapes and level them a bit with the back of a spoon. (Class made rounds, hearts, diamonds and an attempt at a clover was made!)
5. Bake for 2-3 hours until the meringues become dry and crisp. Cool and store in an airtight container for up to 3 days.

Chocolate Mascarpone Mousse (for the top of the Pavlova base):

1 ½ cups (355 mls) heavy cream (cream with a milk fat content of between 36 and 40 percent)
grated zest of 1 average sized lemon
9 ounces (255 grams) 72% chocolate, chopped
1 2/3 cups (390 mls) mascarpone 
pinch of nutmeg
2 tbsp (30 mls) Grand Marnier (or orange juice)
Directions:


1.Put ½ cup (120 mls) of the heavy cream and the lemon zest in a saucepan over medium high heat. Once warm, add the chocolate and whisk until melted and smooth. Transfer the mixture to a bowl and let sit at room temperature until cool.


2.Place the mascarpone, the remaining cup of cream and nutmeg in a bowl. Whip on low for a minute until the mascarpone is loose. Add the Grand Marnier and whip on medium speed until it holds soft peaks. (DO NOT OVERBEAT AS THE MASCARPONE WILL BREAK.)
3.Mix about ¼ of the mascarpone mixture into the chocolate to lighten. Fold in the remaining mascarpone until well incorporated. Fill a pastry bag with the mousse. Again, you could just free form mousse on top of the pavlova.

Crème Anglaise (a component of the Mascarpone Cream above):
(dailydelicious' note: This is the full recipe, I made only half of it)

1 cup (235 mls) whole milk
1 cup (235 mls) heavy cream
1 vanilla bean, split or 1 tsp pure vanilla extract
6 large egg yolks
6 tbsp (75 grams) sugar

Directions:
1. In a bowl, whisk together the egg yolks and sugar until the mixture turns pale yellow.
2. Combine the milk, cream and vanilla in a saucepan over medium high heat, bringing the mixture to a boil. Take off the heat.

3. Pour about ½ cup of the hot liquid into the yolk mixture, whisking constantly to keep from making scrambled eggs. Pour the yolk mixture into the pan with the remaining cream mixture and put the heat back on medium. Stir constantly with a wooden spoon until the mixture thickens enough to lightly coat the back of a wooden spoon. DO NOT OVERCOOK.
4. Remove the mixture from the heat and strain it through a fine mesh sieve into a bowl. Cover and refrigerate until the mixture is thoroughly chilled, about 2 hours or overnight.


Mascarpone Cream (for drizzling):
(dailydelicious' note: This is the full recipe, I made only half of it)

1 recipe crème anglaise
½ cup (120 mls) mascarpone
2 tbsp (30 mls) Sambucca (optional)
½ cup (120 mls) heavy cream
Directions:


1. Prepare the crème anglaise. Slowly whisk in the mascarpone and the Sambucca and let the mixture cool. Put the cream in a bowl and beat with electric mixer until very soft peaks are formed. Fold the cream into the mascarpone mixture.

Assembly:
Pipe the mousse onto the pavlovas and drizzle with the mascarpone cream over the top. Dust with confectioner’s sugar and fresh fruit if desired.


June 2010 Daring Bakers Challenge #41: 
Chocolate Pavlovas with Chocolate Mascarpone Mousse

Sunday, June 20, 2010

Apricot & almond Chelsea buns: Soft and sweet for delight tea time !


I feel like I lack of the bread idea lately, well, it looks like I always make the same things again and again ^^". Why?, I don't know, may be it's so simple to stick to the thing that you like and you can be sure that the result will be great every time. 


But you know that it's not me, I'm not the one who believe in the "ultimate things", or the ultimate recipe! There are a lot of recipes to try, even it means a lot of failure that I will face, I still want to try something new, haha. Some of my best recipes can be the one that you don't like (well, it's a matter of taste, ^^), so I have to try a lot of recipes so you and I will  love some of them.


 But I don't know that it's because of the characteristic of the flour that can be different from country to country or it's me who love to eat a soft bread, I have to add more milk than the original recipe. I believe it's the second reason, because when I went to stay with my sister in UK, I could use my recipe without any adaptation. The result of my adaptation is a soft bread, with a sweet filling that I really love it!


This bread is great both for the easiness (even easier if you use the stand mixer, the dough come together like magic, and if you hand knead it, it's not hard too), and the taste. If you the one who love the dried apricot like I do, you will be very happy!
Anyway, I'm not talk about the "the ultimate Apricot & almond Chelsea buns" ^ ^ I'm here to talk about the recipe that I tried and tested, in the future you may see new recipe for Apricot & almond Chelsea buns again, well, I really can't help it, because it's my mission to try any recipe that I think it might be great and yes, delicious too, haha.


Apricot & almond Chelsea buns
MAKES  1 (23cm round pan)


FOR THE DOUGH


450g ..............................  strong white flour (Bread flour), plus extra for dusting
14g ................................. easy-blend yeast (instant yeast)
1 tsp ............................... salt 
50g ................................. caster sugar
200ml ............................ warm milk
50ml ............................... water
1 ...................................... egg, beaten
50g ................................. unsalted butter, melted, plus extra for greasing


FOR THE FILLING AND TOPPING


25g ................................. softened butter, plus extra for greasing
85g ................................. dried apricots, finely chopped
85g .................................  toasted flaked almonds, plus a few extra to decorate
25g ................................. caster sugar
2 tbsp ............................ apricot jam


1. Put the flour, yeast, caster sugar and salt into a large mixing bowl and mix well. Make a well in the centre and pour in the warm milk, water, the beaten egg and the melted butter (I put all of these in a jug and pour them all at once). Using a dough hook on medium speed, mix everything together to form dough. If the dough is too dry, add a little more warm water; if it’s too wet, add more flour (but do it lightly, if it's too wet start adding just 1 tbsp of the flour or if it's too dry adding 1 tbsp of water, and wait a bit until the water or flour absorbed).Knead until the dough becomes smooth and springy about 5-7 minutes. 


2. Take the dough out of  the bowl  and shape it into a ball on a floured surface.  Transfer to a clean, lightly greased bowl and cover loosely with a clean, damp tea towel (or put the bowl in the plastic bag). Leave in a warm place to rise until roughly doubled in size, this will take about 1 hr depending on how warm the room is.


3. Heat oven to 200C/180C fan/gas 6.  Grease a deep 23cm cake tin. Tip the risen dough out onto a lightly floured surface and knead for a few secs. Roll out the dough to a rough 20 x 30cm rectangle. Spread the butter evenly over the dough, then sprinkle with the chopped apricots, almonds and sugar. Roll up firmly like a Swiss roll from one of the long sides -dampening the open edge to help it stick if you need to. Cut into 8 even slices with a sharp knife, shape into 8 round pinwheels, then arrange in the tin, cut-side up. 


Cover with a clean, damp tea towel and prove in a warm place for about 20 mins until roughly doubled in size. Bake the buns for 10 mins, then lower oven to 180C/16OC fan/gas 4. Cook for 10 mins more until golden brown. 


Melt the jam with 1 tbsp water, brush all over the buns, then sprinkle with a few more flaked almonds.

Apricot & almond Chelsea buns: Soft and sweet for delight tea time !

Wednesday, June 16, 2010

Chicken Farm Baker's Project 23:Spicy Sweet Treats !!! Bell Pepper Tiramisu.


Well, I have to say, this is something that I really want to try a long time ago but I didn't have a chance. Until for this month, the Chicken Farm Baker's Project 23:Spicy Sweet Treats !!!, host of the project want us to make the sweet with a touch of spice!


I can't say that my dessert is the right answer, because it didn't have a spicy taste or a hot flavor at all, ^ ^". But the right thing that I know is I really use the pepper!


I choose to make a bell pepper tiramisu, the first reason, I love mascapone and the second I like bell pepper.
I love to eat bell pepper, I can have it as a snack, well, I think the red and the yellow one are the best sweet with a lovely smell, and I really believe that they can be great in the dessert too.
But not everybody love them like me, so I have to transform the pepper into something special (or, I have to cover their fragrance that some people don't like). First I bake the pepper and get the skin out, this way the pepper will be sweeter and when taking the skin out the texture is great, soft and moist, like a fruit.
Then I chop it and let it sit in the liqueur (I choose Creme de Framboises, it's sweet and smell very good). When tasting it after the pepper soaked with the liqueur, the smell of the liqueur cover it and makes it sweeter.
After turning it into the tiramisu, I let my tasters taste it and ask their feel, most of them say that it's delicious, but they really don't know what is the red and yellow fruit that I use, ^ ^. Well I think that I get my mission done, but for most of you trying something new will be a great challenge and I think this one is worth trying!


Bell pepper tiramisu
serves 4


2 ...................................... Bell peppers
50ml ............................... Creme de framboise 
125ml ............................. Whipping cream
2 ...................................... Egg yolks
30g .................................. Caster sugar
½ tsp .............................. Vanilla paste
125g ................................ Mascapone cheese
50ml ............................... Creme de framboise 
......................................... Lady finger biscuits


- Creme de Framboises -

Preheat the oven to 200°C. 


Cut and seeded the pepper and line on a baking sheet.
Bake in the oven for 20 minutes until soft.
Put the peppers in the plastic bag and let them steam for 10 minutes, then peel the skin from the pepper.
Chop the pepper into 1 cm cube and macerate the pepper pieces in 50 ml of Creme de framboise for 1 hour.

Prepare the mascapone cream:


Whip the whipping cream until soft peaks form, then set aside.


Beat the yolks with the sugar follow with the vanilla paste, beat until light.
Put the mascapone into the bowl and fold with the rubber spatula until combine.
Fold the whipped cream into the cheese mixture.


Dip the biscuit into the 60 ml of Creme de Framboises and place it in the glass, place the bell pepper on top and followed with mascapone cream. Then make another layers of biscuits, pepper and cream.
Refrigerated for half an hour before serving.


Chicken Farm Baker's Project 23:Spicy Sweet Treats !!! 
Bell Pepper Tiramisu.

Monday, June 14, 2010

Great for your health muffin: Berry and yogurt muffins

I really have no reason at all when I bake this muffin, ^ ^, well sometimes life can be like that, we don't need the reason to do something.
All I want is to bake something, for me baking is therapeutic. When I feel down or sometime only bored (haha), all I have to do is go to the kitchen, mix something up and baking it.
But I think it's great to have a hobby like this, haha, because it's not only that you feel better when you making it but when the people you love eating it, you will feel a lot better.
This time, it's almost 8pm. when I start to baking it, after making bread for my dad, I feel bored (well, I make the same recipe again and again) so, I still want to do something more.
Then recipe came into my eyes, well all the ingredients are my kitchen stable (and I think most of you have these at home too). This is the muffin that I think it's great for the people who concern about their health, the vegetable oil is used instead of the melted butter (this time I use rice barn oil, which my friend recommend, it has less smell than other kind of oil), the yogurt, oats and berries are great for your health too.


So, from the reason (that is not a good reason, haha) that I was bored, I got a good muffins to serve my family ^ ^, and a great feeling when I  taste this delicious muffin.
If you feel bored or only want to have a great snack (or you can serve it as a breakfast), just try this recipe. You will see that it's easy to make yourself feel better by baking and other people to be happy when you serve them this delicious muffin too.


Note: I use small (5cm) Japanese muffin tins, but if you use standard muffin tin you will get 8 pieces.


Berry and yogurt muffins
Makes 12 pieces (5cm muffins)


150g ................................ Cake flour
20g .................................. Quick oats
1½ tsp  ........................... Baking powder
.......................................... a pinch of salt
110g ................................. Golden caster sugar
2 ....................................... Eggs
110g ................................. Yogurt
60ml ................................ Vegetable oil
120g ................................. Frozen mixed berries


Preheat the oven to 200°C.
Liner the tin with paper liner.


1. Sift flour and baking powder into medium bowl stir in oats, salt and sugar. Mix eggs, yogurt and oil together, then pour into the flour mixture, follow with berries, mix until just combine (don't over-mix).


2. Spoon batter into the prepared tins, bake for 20-25 minutes. Stand in tins for 5 minutes; turn, top-side up, onto wire rack to cool.


Great for your health muffin: Berry and yogurt muffins

Printfriendly

Related Posts Plugin for WordPress, Blogger...